Post was updated: 3rd April, 2023.
Making money online for free has always been the ultimate goal for every freelancer and business owner of the modern age.
While there are countless ways to make money online, starting a blog and monetizing it remains the most realistic approach for any type of business.
If you already know how a blog works and want to get started right away, you can skip the long post on how to start a free blog and make money guide by following these simple steps below;
The first thing you want to do is buy a hosting account on BlueHost.
BlueHost is the best hosting company in the world, and their plans are super affordable, starting at just $3.75 or ₦2,600 a month.
If you are from Nigeria, you can use any of your naira debit/credit card to make payment.
I suggested BlueHost’s basic plan because it comes with a free domain name, so you will get both hosting and domain name as a combo.
After making payment, follow the instruction and select the optional add-ons if you can afford them.
But the privacy option is important because without it, anyone can see your personal details. And I am sure you don’t want your personal info accessible to just about anyone on the internet. Right?
Once you are done with that, to start a blog and make money for free, you still need to;
- Install WordPress on your hosting account. I am going to show you how to set it up completely in the coming sections.
- Choose a free or paid theme depending on your budget.
- Customize your new theme to your taste.
- Write amazing contents.
- And finally, monetize your blog.
That’s the summary on how to start a blog for free and make money. But if you want to learn the full details, then read on.
So let’s create a blog together. Shall we?
Table of Contents
Step 1: Domain and Hosting
If you want to be super successful with your blog, you need to start the right way. And the best way to do this is to choose the right domain name and hosting company from the start.
Your domain name is the main address that points to your blog, while a hosting account is where we will keep your website files. But one can’t do without the other.
Normally, a domain name would cost you around $12 or ₦11,200 per year and standard hosting, around $7.5 or ₦55,400 per month. Hmm, quite pricey!
However, with BlueHost, you can get a good blog hosting plan for as low as $3.75 or ₦2,600 per month.
I mentioned earlier that BlueHost’s basic plan comes with a free domain name of your choice. Which is extra savings for you.
However, if it’s too expensive for you, or you have issue paying with your Naira card (use Barter dollar cards) due to the new CBN policy of $25/month, there are other cheap hosting alternatives in Nigeria.
If you are unsure about what to choose as your domain name. I suggest that you go with your personal name. i.e. www.JIMOHIB.com.
The reason is that, you might be super sure now that you want to start a marketing blog in the US, only to realize after gaining experience that you’d rather start a blog and make money in Nigeria.
So use your personal name to keep your options open.
Here are some extra pointers when choosing a domain for your blog;
- Keep it short and simple. You don’t want to complicate the name of your address. It should be short and very easy to remember.
- Choose a top-level domain name (.COM, .ORG, or .NET). Google favours them a lot when it comes to ranking of websites.
- Make sure it is very easy to spell and also pronounce.
- Don’t use dashes (-) or numbers in your domain name. It will look weird.
Step 2: Find The Right Niche

This is arguably the most important aspect of starting a blog. Choosing the right niche is the bread and butter of blogging—the soul of your blog.
Your niche determines the type of content you will write, the kind of audience you will attract, and ultimately your monthly or yearly income.
I always tell people not to start a blog for the sake of just making money online.
Blogging is more than just making money for free. Starting a blog should be about giving value first.
To choose you niche, you need to find something you are passionate about, research about it to see if there’s enough interest. If you are satisfied with the niche after this, you can start creating your blog.
If you don’t know how to do market research or the niche to choose, there are tons of articles online on how to do niche research. Devour them all.
But don’t get stuck in this process for too long and waste time. Remember, you don’t have to be an expert to start a blog. Just start as soon as you find something that resonates with you.
Step 3: Install WordPress

To start writing contents for the world to see, you need a content management system (CMS) that makes writing and editing seamless. And for that purpose, WordPress is the number one choice of bloggers.
WordPress powers more than 39% of the world’s websites with a repository of amazing plugins that will make your blogging journey super easy.
Even though WordPress was initially created as a blogging platform, it has now transformed into a software than can build almost any kind of website.
If you signed up using BlueHost, then installing WordPress is easy. Just click on the “Install WordPress” icon from your BlueHost Dashboard and follow the instructions that follows.
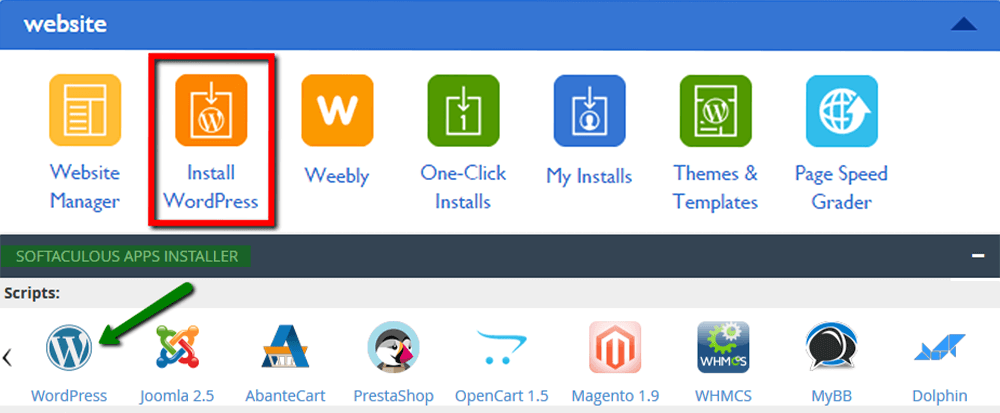
But if you chose another hosting company, then from your cPanel dashboard, locate the section named “Softaculous Apps Installer“. Click on WordPress and follow the on-screen instructions.
Choose the name of your website, enter your desired admin username and password, then click Install. It shouldn’t take more than two minutes.
If all went well, you should be able to visit your domain URL with your ugly homepage as shown in the screenshot below;
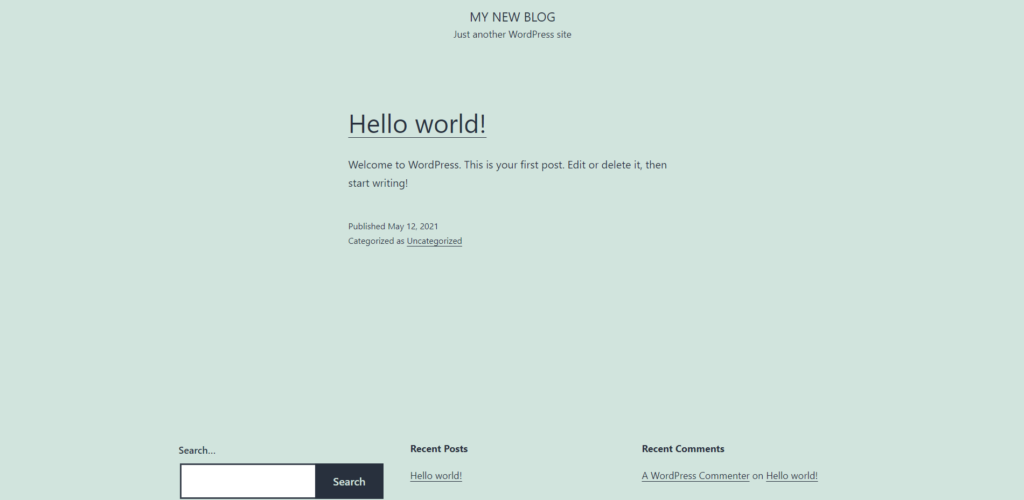
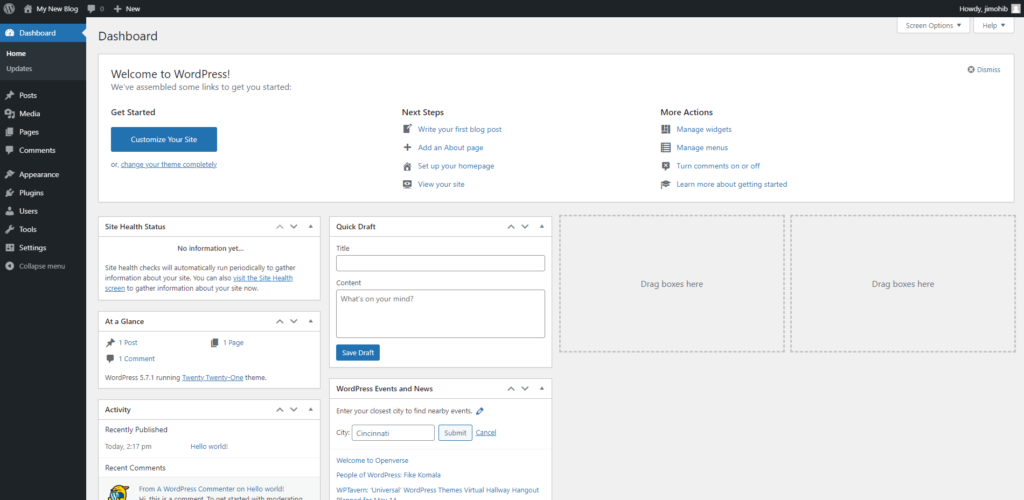
Once all is done, you can either click the admin login link on the setup page or navigate to www.DOMAIN.com/wp-admin to access your dashboard.
It should look something like the image below;
Step 4: Choose a Theme
Before you publish your blog to the public, you need to make sure the design looks great. This will give your users a great experience when they visit for the first time.
Thanks to WordPress, you don’t need to worry too much about the nuances of designing a blog. All this can be achieved using themes and plugins.
There are over 4,000 free themes on WordPress to choose from, and if you’d rather pay for a theme, you can choose from over 10,000 paid themes on Theme Forest.
But for the sake of simplicity, we will be using a free theme for this guide.
To choose a theme, log in to your Dashboard and click on Appearance. It should take you to the themes page by default.
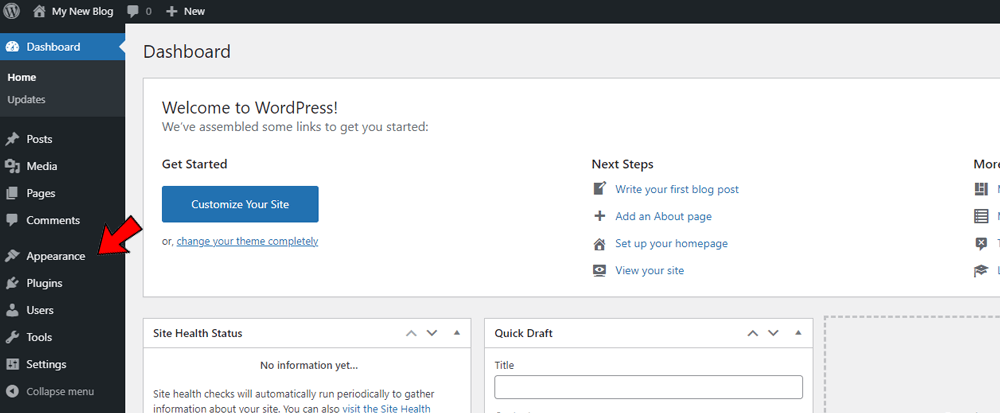
WordPress automatically installs a new theme for you after every new installation. But to choose a new theme for your blog, click on the “Add New” button at the top of the page.

To choose the best theme that will fit your niche, you can filter the theme list by clicking on “Feature Filter“. Tick the appropriate attributes from the drop down menu, then choose a theme from the filtered list.

You can also enter keywords related to your niche in the search bar as shown in #2 above to show relevant blog designs to your industry.
Ideally, you should be able to find quality designs that would have cost you money using these methods. Save the money for other things!
Once you see what catches your eye, it’s time to preview and install it.
To preview a theme, simply hover your mouse on the item and click “Details and Preview“.
The preview might differ from your design because you haven’t customized it yet.
Finally, click on “Install” and “Activate” the new theme.

Step 5: Customize the Theme
To design the theme to fit your brand, you need to make some customizations.
Click on the blue “Customize” button after activating the theme to start editing.
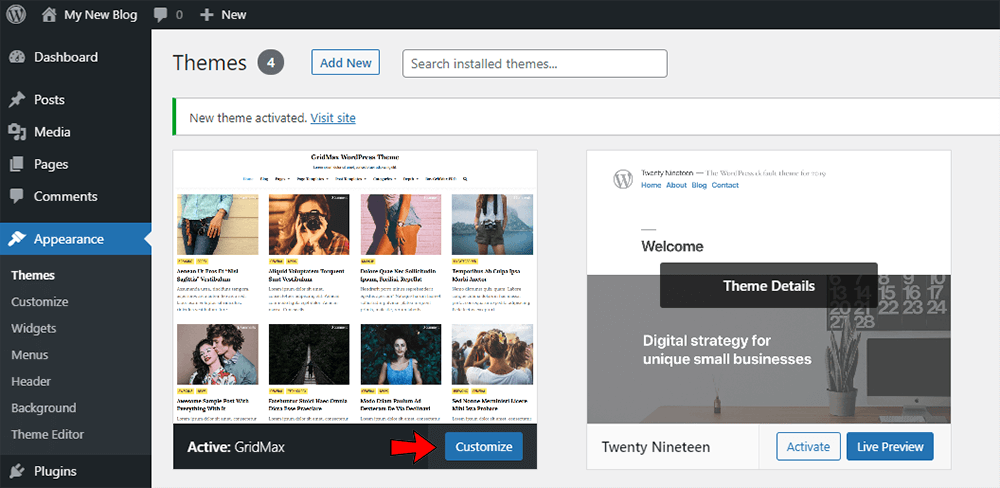
We won’t be focusing on everything on the customization page. For now, we only need to change the “Site Identity“.
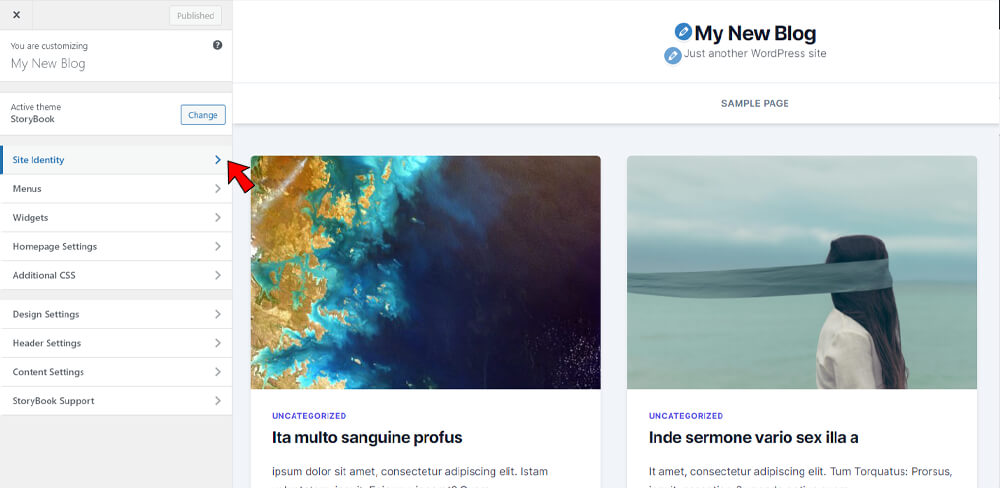
Under Site Identity, you can edit the name, tagline, logo and favicon of your website.
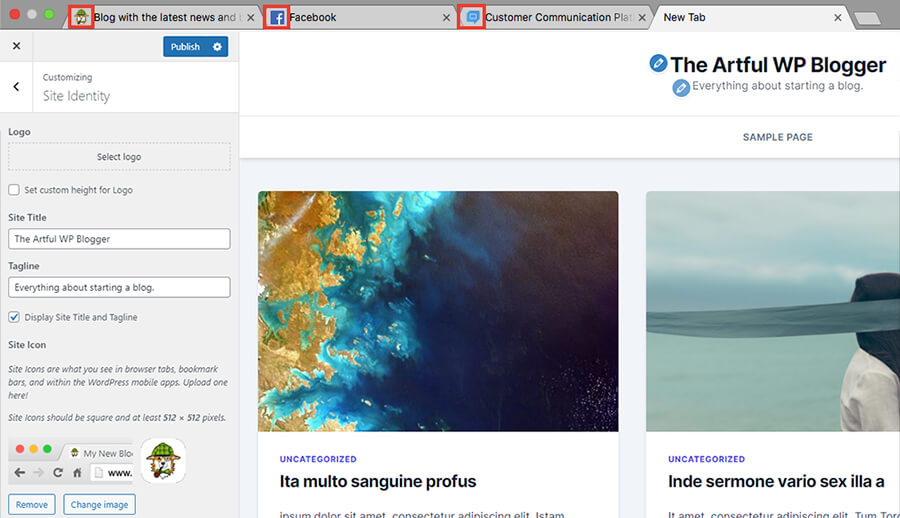
Logo is the image that represents your brand. A horizontal logo mostly do the trick in my experience.
Site Title is the general name your website will be called. i.e. The Artful WP Blogger.
Tagline is the “motto” of your brand. i.e. Everything about starting a blog.
Site Icon also called a favicon, is the small icon beside the website titles on your web browser tab.
The proper favicon for your blog should be an image with no background. And the dimension should at least be 512px × 512px—a square image.
To save the changes you’ve made thus far. click on the “Publish” button to save it permanently.
Step 6: Add Important Pages
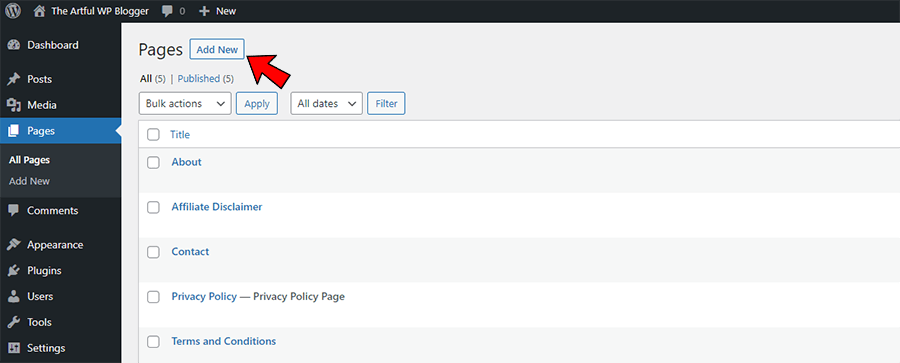
Another important thing we need to work on is Navigation. But we need to create some pages first before we can crate our navigation menu.
Ideally, there should be more than one page on your website if you are really serious about starting a blog.
So to add a new page: From your Dashboard → Pages → Add New.
On the add page screen, you only need to concern yourself with three things.

The first thing is the Page Title which is marked #1. Then followed by the Text Editor, marked #2. And lastly, the Permalink or URL slug (#3).
Your URL slug is the last part of your domain. i.e. www.DOMAIN.com/url-slug.
If you are unhappy with the default slug, you can edit it from the permalink tab.
When you are done editing, click on “Publish” to create your new page.
Most platforms you need to make money will require some pages on your blog before they can monetize your website.
To be considered, you need to set up the following pages;
- About Page — It should explain what your blog is about and what you will be writing about. Your vision and mission statement applies too.
- Contact Page — As a blog owner, you should be easy to reach in case your readers want to ask questions or send emails.
- Privacy Policy Page — This area should explain what and how your blog uses the data it collects from its visitors.
- Affiliate Disclaimer Page — If you will be promoting affiliate products on your blog, you need to state your intent beforehand.
The Affiliate Disclaimer page is optional in many countries (including Nigeria) but compulsory if you will be promoting affiliate links in the US.
Step 7: Create a Menu
There are two ways of adding a navigation menu to your WordPress blog.
You can either do it from the Customization page → Menus, or from your Dashboard → Appearance → Menus.
I prefer the second option because it offers more options and features.
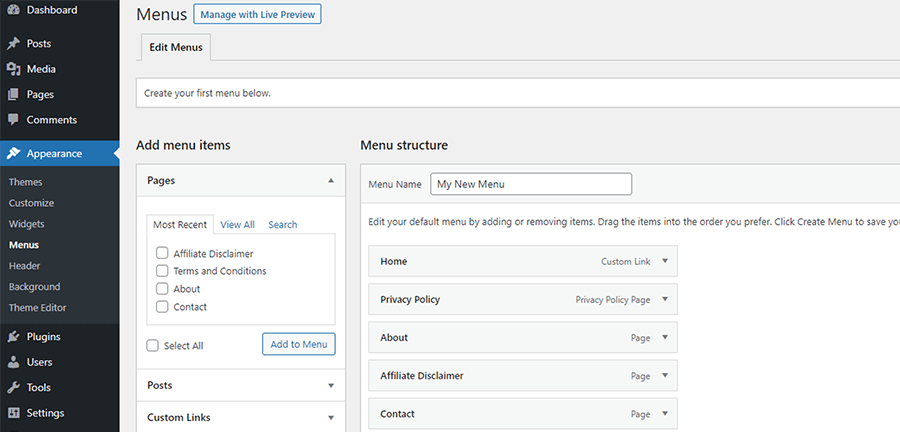
By default, WordPress will prefill your menu with a list of existing pages, and will title the menu; “Menu 1“.
You can start working with the default menu by editing the menu name or by adding or deleting entries.
To add a new entry, simply tick the checkbox in front of the page name, then click “Add to Menu“. You can rearrange the items by dragging the menu entries up, down left or right. You can also add categories and posts to your menu.
To delete an entry, click on the small arrow on the item, then click “Remove“.
Save the menu by selecting the primary display location then hit the “Create Menu” button in the bottom right corner.

You can now visit your homepage to see your new menu.
Step 8: Adding Plugins and SEO
WordPress plugins give you the no code way of adding more functionality to your blog. That means we can do On-Page SEO, add extra layers of security and so on without writing code.
To keep this guide short, I will be sharing my five must-have plugins when starting a new blog and how to add them to your website.
But I won’t be going deeply into how to configure each of these plugins because they are all fairly easy to set up.
Adding a new plugin
Adding new plugin is very similar to adding a new theme. So to add a new plugin—from your Dashboard → Plugins → Add New.
Five important plugins
JetPack — This plugin help speed up your blog by serving all your images from WordPress’ content delivery network (CDN), blocks spam, add social share buttons to posts and so on. It offers both paid and free plan.
WordFence — This adds extra layers of security to your WordPress blog to reduce hackers and spammers. Available as both free and paid, but the free plan works fine.
Akismet — This plugin comes preinstalled with WordPress to block spam comments but you need to activate it with a free or paid API key to start using its features. But you can only use the free API key if you won’t be monetizing your blog.
WP Super Cache — A free caching plugin that makes your WordPress blog load super fast. You can watch this 2-minute video to learn how to set it up.
Rank Math SEO — Gives you access to the SEO tools you need to improve your SEO and gain relevant traffic to your WordPress blog.
Rank Math SEO is by far my favourite WordPress SEO plugin as I’ve used it countless times on my websites. Moreover, I’ve been an advocate of this plugin from day one.
How to Set Up Rank Math SEO
For the purpose of optimizing your blog for SEO, I will walk you through the installation and configuration process of this SEO plugin.
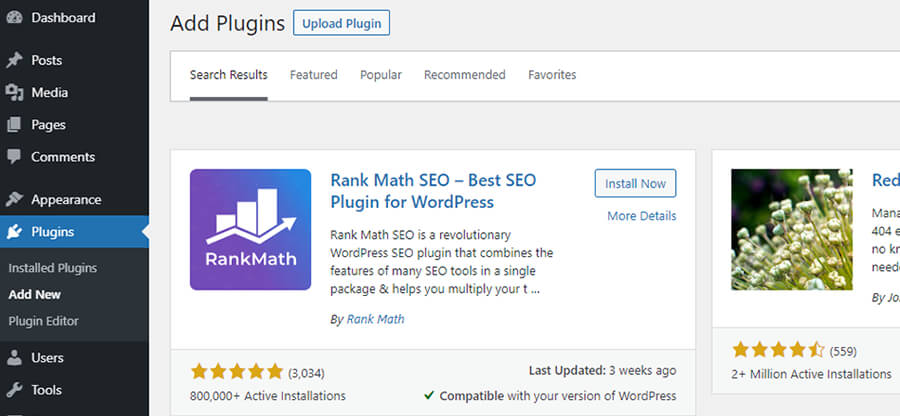
To get started, make sure you’ve installed and activated the plugin from the “Add Plugins” page. Type “Rank Math SEO” in the search bar to find and install the plugin.
When you activate Rank Math SEO plugin for the first time, you will be shown a setup wizard screen.
First thing you need to do is to create an optional account to access extra features of the plugin such as; Keyword suggestions and Analytics.
I suggest you create the free account to gain access to those features. They are worth the two minutes it takes to register.
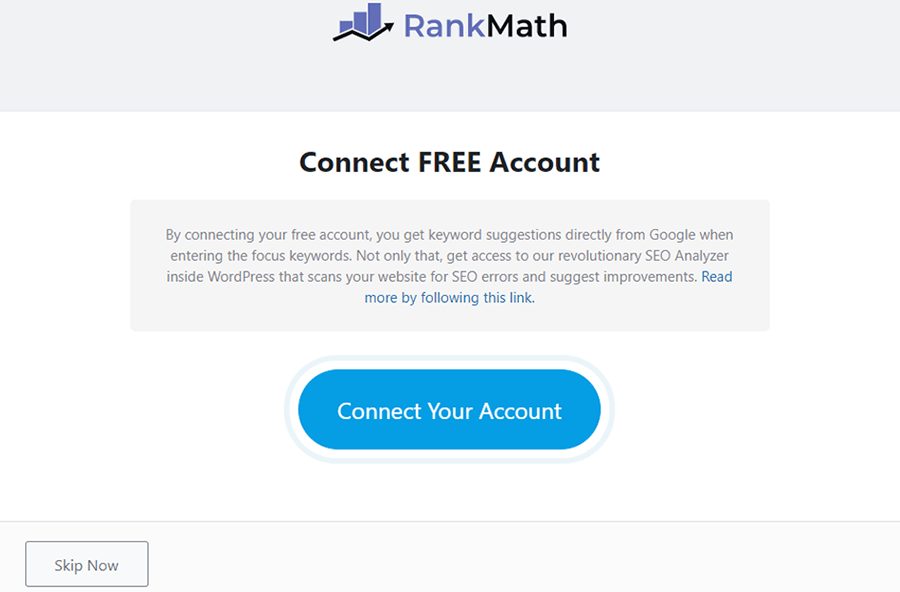
After registering, you can now log in with your account details. And It will automatically take you to the next step as shown below;
To keep this beginner-friendly, we will choose the “Easy” setup mode for now.
You can switch modes at any point to explore more features. But we will let Rank Math SEO do most of the work for us with Easy mode.
To locate the setup wizard at anytime, navigate to your Dashboard → Rank Math → Setup Wizard.
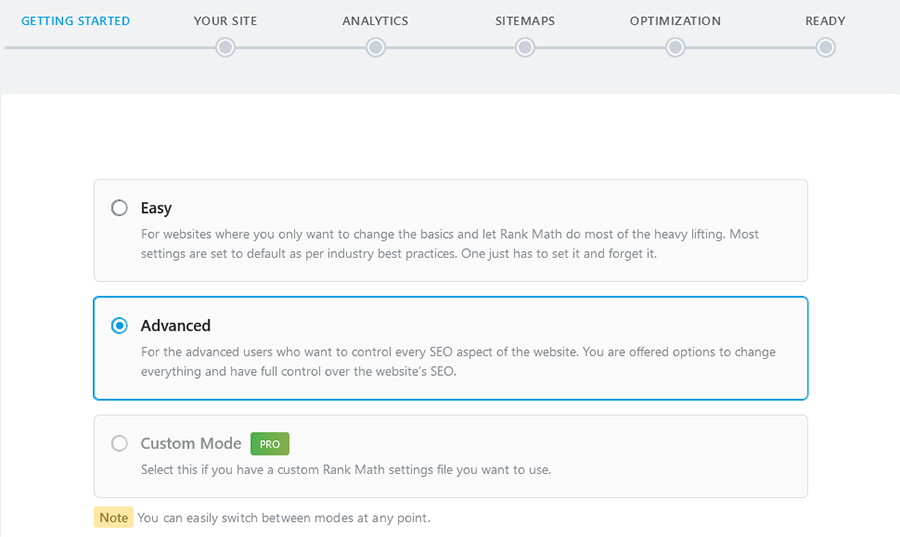
Click “Start Wizard” to begin the easy setup wizard.
On the page that follows, provide your website type, your blog logo and your default social share image.
Since we are running a blog, choose “Personal Blog” if are the only author or “Community/News Site” If you have multiple authors on your blog.
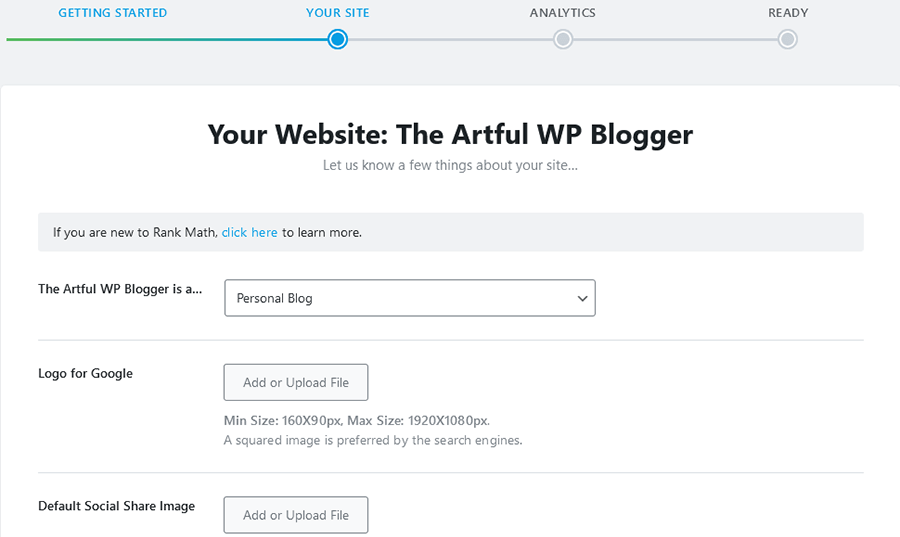
Next up, add your blog logo. For best results, upload a square image of your logo.
You can put your logo on a square white background if you don’t have a square image of your logo.
And finally, add a default social share image. This will be used by social networks if any of your post is shared but missing a featured image.
Per my tests, images in landscape mode works well in this section.
When you are done with all the tabs, click on Save and Continue to move to the next step.
Setting up Google Analytics
Google Analytics is a web-metric tool developed by Google to help measure and report website traffic. With Google Analytics you will be able to see which page is getting the most clicks and also track other users’ behaviours on your blog.

Before we can benefit from Rank Math SEO’s Analytics feature, we need to create a Google Analytics property for our new blog.
To do this, we will need to visit Google Analytics to create a free account.
After signing up with your Gmail account, click on “Start measuring” to get started.
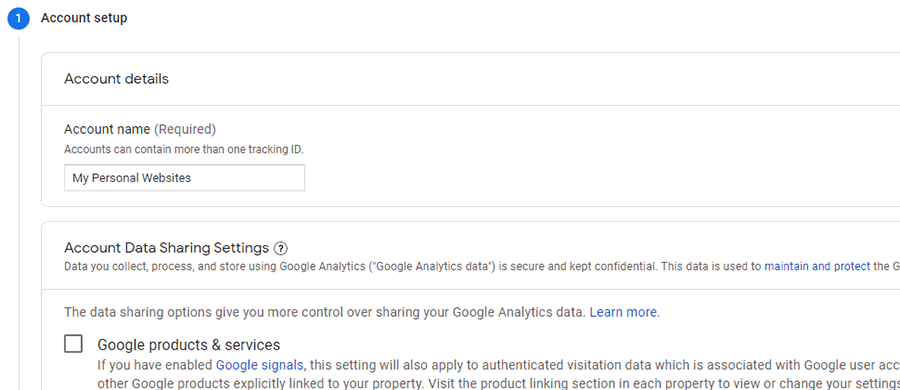
You should now see a page asking you to fill your account name. One Account can contain multiple websites to track, including your new blog.
So I named this account “My Personal Websites” to contain all my blogs. But you can choose any name you like.
Click “Next” to move to the next section.
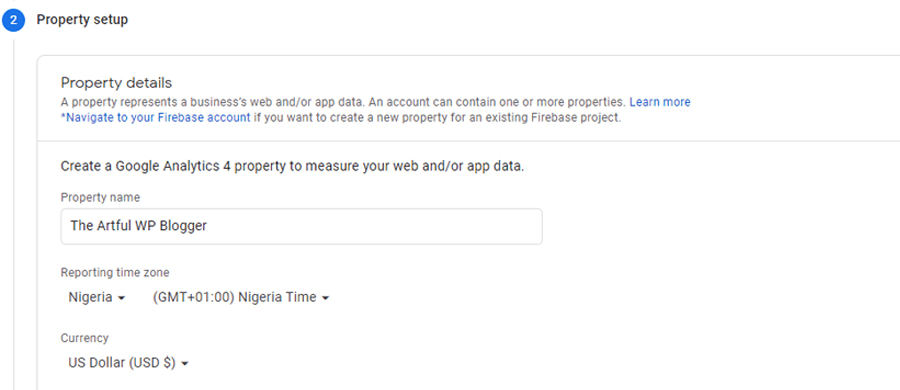
The next step is the Property Setup. A property means a website or an app. And in this case, it’s our blog which is a website.
So type in the name of your blog and change the reporting time zone to your location.
For the currency part, I prefer to leave it at USD because I pay for things online mostly in USD. But then again, you have the option to do otherwise.

Under Advanced Options, click the toggle to enable Create a Universal Analytics property.
Click on “Next” to save your changes and move to the next step.
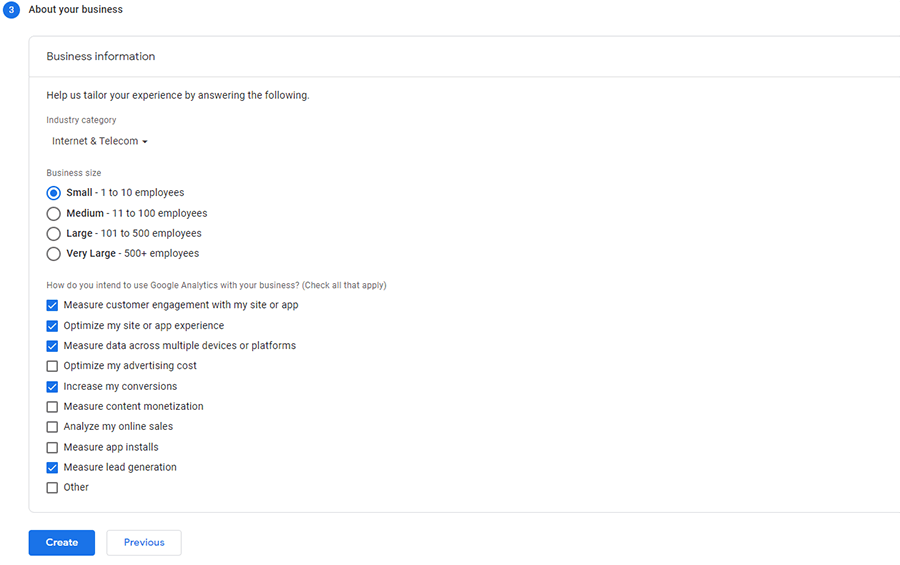
Finally, fill in your business industry, the size and your intents in this section. Then click “Create” to set up your Google Analytics account.
You will be presented with the terms pop-up. Switch the region to your country, read the TOS (LOL) and click on Accept to proceed.

If you’ve been following, you will be asked to add a data stream. Choose the “Web” platform to add the data stream from your blog.
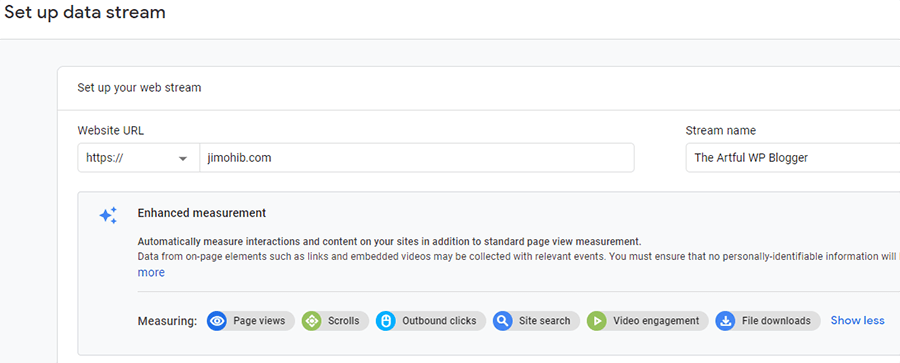
Next up, add your website URL and the name you want to call the new stream.
Click on the “Create Stream” button to generate your Google Analytics Measurement ID.
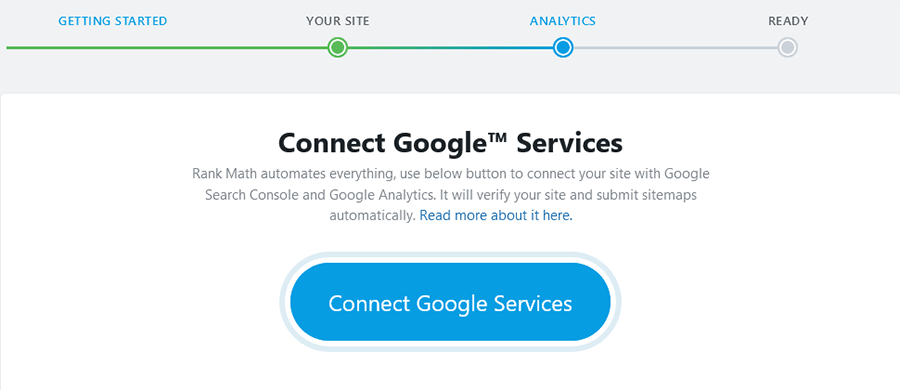
Now, go back to the setup wizard to connect your Google Analytics account to Rank Math SEO.
Click on “Connect Google Services” to add your new analytics account your WordPress blog.
It will ask you to login to your Gmail account and accept some permissions to complete the connection.
Grant all permissions by clicking Allow on the prompts.
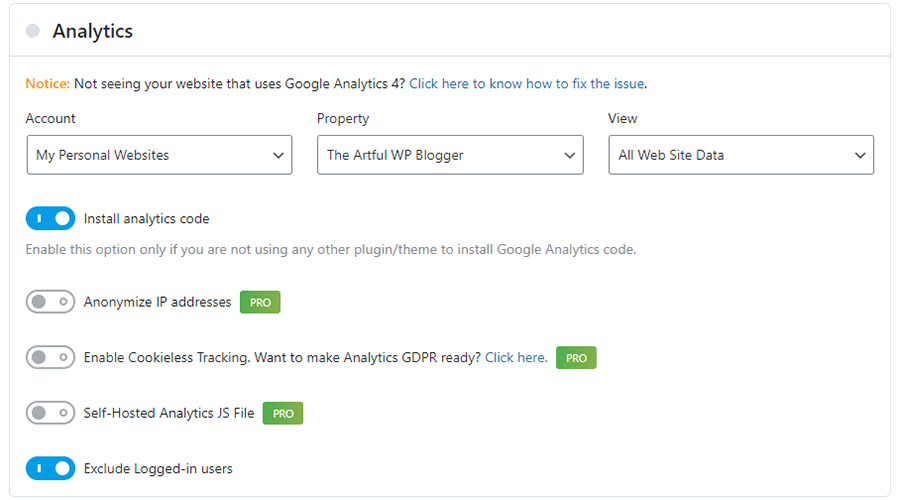
After granting the permissions, choose the Analytics account from the dropdown menu.
Select the property and choose All Web Site Data as the view. Toggle the Install analytics code and Exclude logged-in users buttons.
Rank Math SEO will also add your website and sitemap to Google Search Console automatically after this step.
Finally, click Save and Continue to complete the setup wizard.

Rank Math and Google Analytics will now start tracking all the activities on your blog.
You can find the Rank Math Analytics report from your Dashboard → Rank Math → Analytics.
The report can you valuable insights about your visitors and how you can better serve them with your contents.
Step 9: Write Your First Post
Everything we’ve been doing up to this point is to make this section possible. As you well know, content is the most important thing on a website.
So to create your first blog post, you need to log in to your admin dashboard. Then from your Dashboard → Pages → Add New.
You will notice that the interface is very similar the “New Page” screen. The Post Type is an advanced Page Type on WordPress.
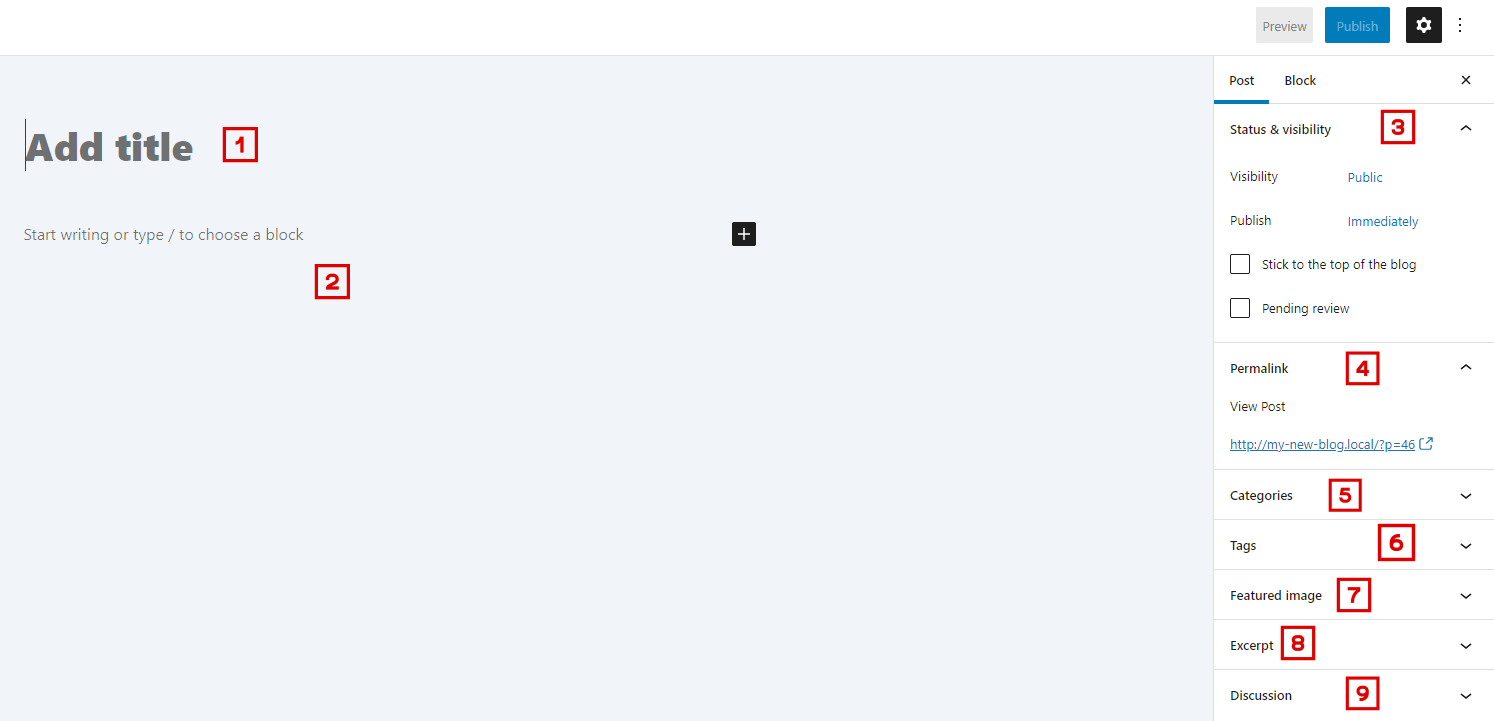
Let’s now talk about the tabs on the new post screen below;
- #1. Post Title → The title of your new blog post goes here.
- #2. Post Content → Everything about your article goes here. Headings, texts, links, images and so on.
- #3. Status & Visibility → You can save your posts as draft, schedule a post or publish them immediately here.
- #4. Permalink → You can edit your URL slug here. i.e. www.DOMAIN.com/URL-slug.
- #5. Categories → Set the desired category for this post here. Categories are used to organize your posts by topics.
- #6. Tags → Tags can be used to further organize your posts. But unlike categories, tags are optional.
- #7. Featured Image → The general image that shows up for this article goes here.
- #8. Excerpt → You can write the summary of the post here. It will show up on the blog’s archive page.
- #9. Discussion → You can allow or turn off comments for this particular blog post here.
At the top right-hand corner, there are two buttons—Preview and Publish respectively.
To see the live changes of your article without publishing, click the “Preview” button to see the live version of your post.
But when you are ready to publish your article, simply click on the “Publish” button to make your post public.
To make posting of new contents a habit, you should consider creating a plan with a content editorial calendar for your new blog.
Download our free editorial calendar.
To copy the editorial calendar template, click the link above, navigate to File → Make a Copy to save the calendar to your Google Docs.
Optimizing Your Post
It doesn’t matter if you write like Wole Soyinka, if you fail to optimize your post for search engines, then you’ve wasted your time.
As I mentioned above, research should always come first before you type a single word. And during the optimization phase, the keywords from your research will be the blueprint for the On-page SEO of that post.
Rank Math SEO guides you through the optimization process when you enter your Main Keyword in the SEO tab on your blog post.
To access the SEO feature on your WordPress post, click on the horizontal red tab in the top right corner as shown below.

The number you see on the tab shows your current SEO score. You should always try to get at least 80/100 on all your blog posts to rank well.
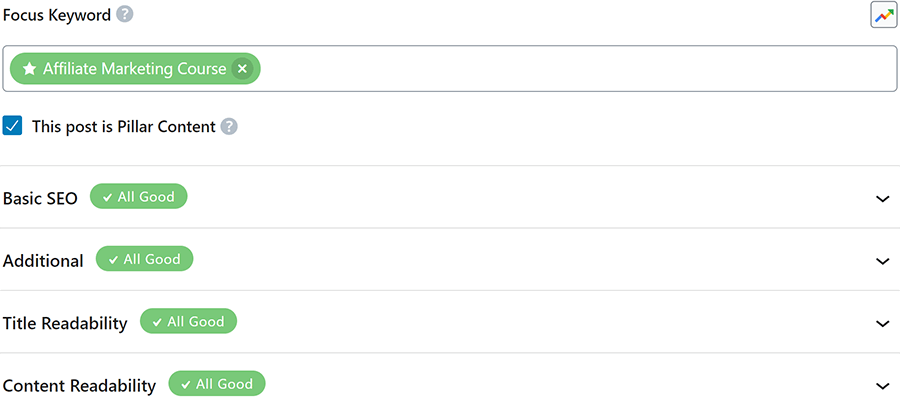
To gain access to the SEO advice Rank Math provides, we need to enter our main keyword in the Focus Keyword tab.

Adding your focus keyword to this tab will update the optimization tips below this section.
There are four optimization categories in the SEO tips panel. They are; Basic SEO, Additional, Title Readability and Content Readability.
To boost your SEO, you need to meet the requirements in these four categories—scoring at least 80/100 overall.

Rank Math SEO will tell exactly what you need to do to improve each category.
Make sure all tips in Basic SEO, Additional and Content Readability are marked green before publishing your article.
Sometimes, getting 100/100 isn’t possible. And getting 100/100 doesn’t guarantee higher rankings on Google.
Likewise, getting below 100 doesn’t mean you won’t rank on Google either.
The things you need to pay attention to are the Title, Meta Description, Permalink (URL) and Focus Keywords.
To prime your post for clicks from search engines, the headline and meta description must be catchy and attention-grabbing.
You can create catchy post titles with this free headline analyzer.

Rank Math SEO plugin will show you a preview snippet of how your post description and title will appear on search engines.
To change the title, URL or meta description of your post, click the “Edit Snippet” button to make your changes.
After optimizing your post, answer these questions honestly to confirm that you are ready to publish;
- Have I given the readers what they want?
- Did I answer their questions and objections?
- Does my content flow naturally?
- Did I use a lot of white spaces to make the text easier to scan?
- Did I speak in a conversational tone?
- Did I use headings to separate the sections?
- Did I use bullet points and lists?
- Have I checked for typos and grammatical errors?
- Did I use a table of content (More than two thousand words)?
If you can answer YES to all of these questions, then you are 100% ready to publish your post!
Step 10: Monetizing Your Blog

While making money shouldn’t be the main reason to start a blog, monetization is still an important aspect of blogging.
We all want to be able to put food on the table for our loved ones while doing what we love. And monetizing your blog can make all the difference.
When it comes to blog monetization, there are FOUR popular ways of making money;
The fours ways of monetizing a blog are;
- Information Products
- Freelancing
- Advertisement Space
- Affiliate Programs
Let me now explain how they work;
Information Products

Information product refer to any form of digital product you can buy or sell online—Webinars, Zoom Meetings, Online Courses, Ebooks and so on.
One of the fastest ways to monetize your blog is to sell your knowledge in the form of an info product.
Say for example, you want to start a blog for money. When you are consistent and have amassed a good number of readers.
You can sell a guide titled; Create a Blog for Free and Make Money and people would gladly exchange their money for such information.
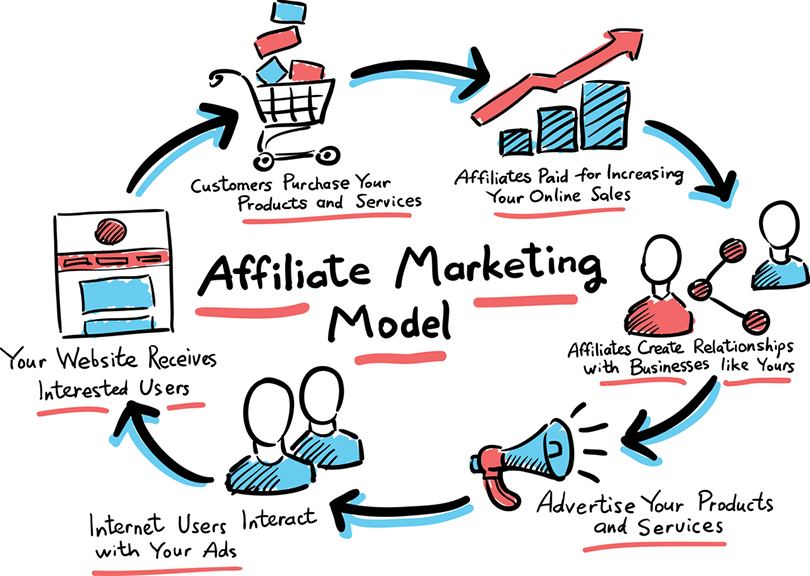
You can get an army of affiliates on popular affiliate marketplace like WarriorPlus or JVZoo to help you promote your product for commissions.
I understand that selling info products might be new to you, especially if you are just starting out. But, I can assure you that there are bloggers making thousands of Naira per month selling only information.
Just do your research and find a topic you can create a product around. If you will be using affiliates, you shouldn’t worry too much about competition or if the topic is not that popular.
But pick something you are comfortable with and find out if people are actually looking for help or information in that niche.
Next thing you want to do is decide the format that suits your audience.
Your audience might prefer videos, and you are camera-shy. Still, you can outsource the video part or use the text format instead.
If your information is unique and valuable, your audience won’t care about the format. Text and videos are most common digital formats.
There are others who’ve had success using audio and podcasts too, but videos and text are the best if you are just starting out.
When setting your price, it should be fair and affordable. You want to earn enough to make it worth your while as well as the affiliates that will be promoting and reviewing your info product.
Setting too steep a price can send people running for the hills. So do a comparison check to see what your competitors are charging.
As you continue to build a list of buyers from your first product, you can start working on your second info product.
You might need to find out from your current customers what they’d like to learn next with surveys and polls, or you can continue serving them based on your initial topic research.
Freelancing

Sometimes, the only skill you have to offer as a service is the one you use daily as a Writer, Graphics Artist or a Customer Service Rep.
And sometimes, you might not have the time or desire to create and launch an info product.
If you fall into any of these categories but still want to monetize your blog, you can offer your services to businesses online instead.
Although, many people get these type of jobs through word of mouth, you can also use your blog as a tool to attract people who need your services.
A lot of businesses pay top dollar to hire freelancers online. And if you have been blogging in the same niche that aligns with your service, then you will eliminate a lot of objections, setting yourself up as an expert.
This model is very similar to what we do here at Tech O’Clock. We create contents for the sole purpose of driving relevant traffic to our website.
As you must have guessed, some of our readers end up becoming customers, which tells you that the blog-for-service model works.
Advertisement Space

Selling ad spaces on your blog to make money online is arguably the most popular blog monetization method. And it’s due to the fact that it predates the other methods on this list.
You have probably come across websites showing all sort of ads. And some of these ads you see are powered by Google AdSense.
Google AdSense allow bloggers to sell spaces on their website for ads, and in return they get paid based on impressions (CPM) and/or clicks (CPC).
Although, AdSense isn’t the only ad network, but it is my favourite due to the following reasons;
- Higher fill rate (Continues to show different ads, which means, more money)
- Higher cost per impression (CPM)
- High cost per click (CPC)
- Works with all type of visitors (No age or country barrier)
- Even higher CPM if your visitors have personalized ads switched on
As you can see, no AD network pays like Google AdSense and also why it’s the number one choice of bloggers in any country.
But, knowing about AdSense is one thing, getting approved is another because Google doesn’t joke with the application process.
They are well known to reject applications or even disable your whole account if you do the slightest thing wrong.
However, I am going to share a simple process with you that can get your Google AdSense approved faster even if it’s a new blog.
A lot of people apply for Google AdSense only to get rejected because they didn’t follow the rules before applying.
Google laid down a set of requirements before you can register for AdSense, and they need to be met to get approved.
Before applying for AdSense, the following should be present on your website;
- Main Menu
- Sidebar
- Contact Page
- Privacy Policy Page
- TOS Page
- About Page
- High Quality Posts
All of these, except the TOS page must be present on your website before Google will even consider your application. But if you have everything present, then you will most likely get approved.
If you are running a normal blog then the TOS page isn’t required. TOS page is only required if you offer services on your website.
For the main menu, make sure all the pages listed on your navigation bar are not empty. You can add your post categories to keep it populated.
As for the Sidebar, you should remove anything that is taking up space. If your sidebar is full of other things, then your application might get rejected.
When you apply for a new AdSense account, your blog goes through a human review by the Google team, and they want to see areas where they can put their ads on your website.
So remember to keep your website design simple and well-structured to get approved for Google AdSense.
Finally, you need to have at least 10 quality posts on your blog to get approved. All articles must be unique—not copied or rewritten.
Affiliate Programs

Becoming an affiliate marketer is one of the best ways to monetize a blog for beginner.
In the same way affiliates can help you promote your product, you too can promote other people’s products on your blog for commissions.
Getting started in the affiliate marketing niche is free. And you can literally make your first dollar in your first day.
At least, I was that lucky when I first promoted the Red Tea Detox Program a few years back.
Even though I used Facebook ads to get my first sale back then, you don’t have to spend money on ads to start promoting affiliate products.
With affiliate marketing, you can start recommend products from almost any niche using a variety of methods on social media.
But don’t be a Jack of all trades. The product you want to promote should resonate with your topic and niche. Imagine us, a digital marketing agency promoting a Basketball program on our blog?
It wouldn’t make any sense to our audience. So If you need to promote a product from a different niche, you should create a blog and make money for that purpose.
The top affiliate marketplace to find products are;
- Click Bank
- JVZoo
- Warrior Plus
- Expert Naire
- Share-A-Sale
- Commission Junction
- …and Direct Programs
You can join any of the affiliate marketing platforms above. And most of them are free to join except Expert Naire, which requires a ₦10k sign-up fee.
Once you’ve joined a platform, you can start looking for products to promote using their search bar.
The things to look out for before choosing a product to promote are; The rating of the products, average commission per sale and the refund rate.
Most affiliate platforms give a 30-day refund-policy to their customers. So if the refund rate of the product is high, it’s most-likely a bad product. You should avoid those kinds of product.
You should know that some vendors on these platforms will require a manual verification before you can promote their product.
They might need you to submit additional information like your experience and how you intend to do your promotion.
Don’t lie, just them everything they want to know. Most times, you will get approved and can start promoting the product.
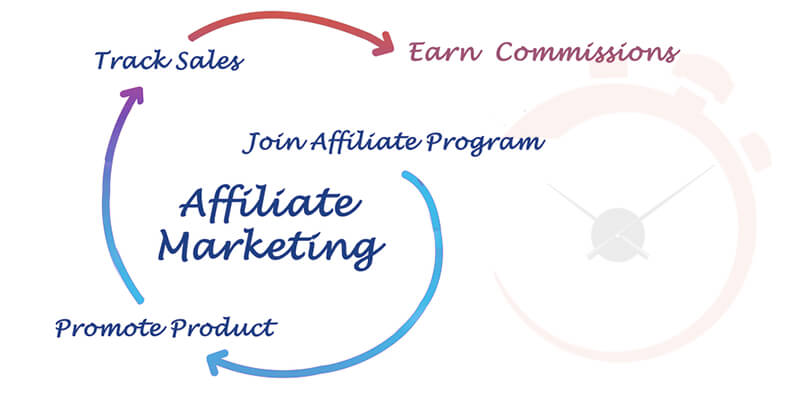
Also, there are some companies you won’t find their affiliate products on these platforms. And this is because some of these companies prefer to host their affiliate programs directly for quality control.
Some direct affiliate programs include; BlueHost, WhoGoHost, QServers and so on.
If you want to make money in the affiliate marketing industry, you need to either invest in paid ads or improve your search engine presence to rank for the product keywords instead of paying for them.
Q’s About How to Start a Blog for Free and Make Money
Is WordPress the Only Blogging CMS?
Nope! There are other blogging CMS out there like Blogger, Wix, Joomla and so on.
But per our research, there’s no match for WordPress, thanks to its awesome community and plugins.
For Real, How Do I Start a Blog?
The first thing you need to do is to get a domain and hosting plan. Then install WordPress, choose your theme, and start posting your articles!
How Do I Optimize My Blog for SEO?
Choose a good SEO plugin from the WordPress repository like Rank Math SEO, set up your Google Search Console and Analytics, make sure your Sitemap is set up properly (Rank Maths will create and upload this automatically), and finally, set up the permalinks.
Can I Start a Blog Without Hosting?
Unfortunately, no! A web host is required to house your website for people to be able to read your posts. Your hosting server is where WordPress and your other website files are stored.
There are platforms that allows you start a blog without paying for hosting. WordPress.com (Not WordPress.org) or Blogger allows you to create a blog, which they host your files but in return you must keep their domain name i.e. name.wordpress.com or name.blogspot.com.
If you want to remove the domain limitation, you have to choose a premium plan which means you start paying for the hosting.
Can I Start a Blog on Instagram?
No, you can’t start a blog on Instagram. A blog usually includes a text editor that allows you to format your post, a feature you won’t find on Instagram.
How Do I Know What to Name My Blog?
If you are finding it hard to come up with a name for your blog, you should consider using a business name generator. Most of them are free to use but you should do a name search yourself to confirm the name is not already in use.
How Do I Make Money Blogging?
There’s a popular myth that blog owners make money by taking part of people’s mobile data when they visit their sites. This is 100% wrong!
If you want to make money blogging for free, you should consider selling your services, promoting other people’s products or selling ad spaces on your blog to Google AdSense or other AD networks.
Can I Start a Blog in Any Language?
Absolutely! You don’t have to be an English-speaking person to start a blog. You can write and optimize your blog using any language of your choice and Google would still rank you for those keywords in that language.
How Can I Speed Up My Blog
Speed is one of the most important things when starting a blog.
The average visitor will only wait for about 5 seconds for your website to load before they close the tab.
To make your blog load faster, you need to choose a good hosting company, install a caching plugin, compress all images before you upload them using TinyPNG and finally, serve your website over a content delivery network (CDN) like Cloudflare.
Can I Start a Blog on My Phone?
Apps are now available on smartphones that allows you to create a blog on your phone. But the problem with these approach is that it becomes almost impossible to migrate your blog to another platform like WordPress.
So it’s better to host your blog on a popular CMS like WordPress to benefit from its huge plugin and theme repository.
You can also download the WordPress app from both the Google Play Store and Apple App Store to manage and publish posts on your blog.
Conclusion
That’s everything you need to start a blog the right way. It’s now left to you as always to take action.
Even though starting a blog is easy, creating a blog that will continue to make money for you to quit your job will take a lot of time and sweat.
But in the end, it’s always worth it to give out massive value without expecting the same thing back.
Aside the giver’s high you get, the universe somehow finds a way to reward you. I know it sounds spiritual, but that’s how the universe works.
One thing you should always keep in mind when you write is to “Always Give Value First” or even better, “Give Your Best Things Out for Free“.
As you well know, good things takes time. So it might take some time for you to start gathering loyal subscribers but you will definitely get there as long as you don’t stop writing.
I hope by now you can start your blog without worrying about which step to follow. And if you have any questions, leave a comment below and I will make sure to respond to them as soon as possible.
So go create your blog right now.



Uduak Odungide
Does this also apply to a Vlog?
JIMOH Ibraheem
Yes it does. Most of the things discussed applies to a video blog, including YouTube.
While you don’t need a domain and hosting for YouTube, you can still monetize your channel with all or some of the monetization methods listed and some SEO tactics like; adding your focus keywords in your video description and title.
But if you want to run a video-based website for your blog instead of YouTube, then everything here will also apply to your Vlog website.
Web Hosting in Nigeria: 6 Best Web Hosting Companies in 2022
[…] web hosting service is more than suitable for any type of website, even if you want to start a blog or create a free ecommerce […]
sitherens
Excellent post! Thank you for giving us an idea about this. Looking forward to the next one.
Jimoh Ibraheem Babatunde
Thank you so much.
nam
good look
Starting a WordPress Blog and Making Money in 2022
[…] Here are some ways in which you can earn money from your WordPress blog. […]
Lookkle
This approach is beneficial as it allows readers to weigh their options and choose the platform that best suits their blog’s niche and target audience.
alex wale
I’m so pleased to hear that you enjoyed the article.
Gerlline
Thank you for addressing the potential of offering virtual tutoring or educational services, leveraging your expertise in a specific subject or field. It’s a way to make a positive impact while making money.
Abdulwahab
Your post highlights the potential of becoming a freelance proofreader or editor for authors, publishers, or businesses looking to ensure the accuracy and professionalism of their written content.