Link Whisper is a very clever internal linking tool with tons of flexibility.
In our review of Link Whisper, we covered everything about this Plugin and whether it’s right for your type of business.
In this post, we’ll focus on how to use this Plugin and make the most of it, from auditing to automating internal linking, to finding link-able opportunities.
It will be an eye-opener regarding what Link Whisper has to offer and how to use it to save time and stress.
Ps. To find out if this Plugin is still the leading option, check our internal linking tools masterpiece.
What is Link Whisper?
Link Whisper is a wordpress plugin and a Shopify tool that lets you overcome the hurdles of internal linking. The tool’s main feature is to provide you with internal link opportunities as you write/edit your post or after a new post’s release.
The internal link suggestion facilitates the work on WordPress. And it stops you from visiting your older posts trying to find link-able opportunities.
Aside from suggesting interlinking opportunities, Link Whisper caters to every thing internal linking – From internal links breakdown and visualization (which lets you identify links on each page), to the keyword-based linking (which lets you do full yet relevant automation), to the Linked-To Domain settings (which makes link attribute/behavior automation possible), are some of the beauty in Link Whisper.
Why do internal links matter?
Internal links are important for so many reasons.
- Increases Dwell Time: Linking to related articles encourages users to stay longer on your site, improving user signals.
- Improves Website Navigation: They help users move through your website effortlessly, making it easier to find relevant content.
- Distributes Page Authority: Internal links pass link equity (authority) from one page to another, boosting overall SEO.
- Enhances User Experience: By connecting related content, internal links keep users engaged and reduce bounce rates.
- Boosts Search Engine Crawling: They guide search engine bots to discover and index more pages on your website efficiently.
- Encourages Content Discovery: Internal links help users explore lesser-known pages, increasing page views and engagement.
- Supports Keyword Strategy: Anchor texts in internal links reinforce keyword signals to search engines, improving rankings.
How to use Link Whisper to automate WordPress Internal links?
Here is how to use Link Whisper to implement internal linking automation
-
Use the outbound internal link suggestions to build outgoing links
-
Utilize the Internal links reports to find and fix orphaned content
-
Utilize the Internal links analysis to find links that are used for each page
-
Use the Linked-To Domains Reports and Settings to set global link attributes and behaviors
-
Repeat for complete advantage
Notice: The Linksy AI has rolled back its lifetime deal. If you need a tool for interlinking, don’t let this opportunity pass you by. Visit our page, Linksy AI Lifetime Deal to learn more. It is a complete replica of Link Whisper’s features.
Installing and setting up Link Whisper
First and foremost, you need to get a Link Whisper license.
To do that, kindly follow our Creator Link. Then on the checkout process, apply our personalized discount code ZEALOFF to avail $15 OFF.
After you have grabbed your license, it’s time to get the Plugin onboard. Just follow the regular way of installing a WordPress Plugin.
Setting up Link Whisper
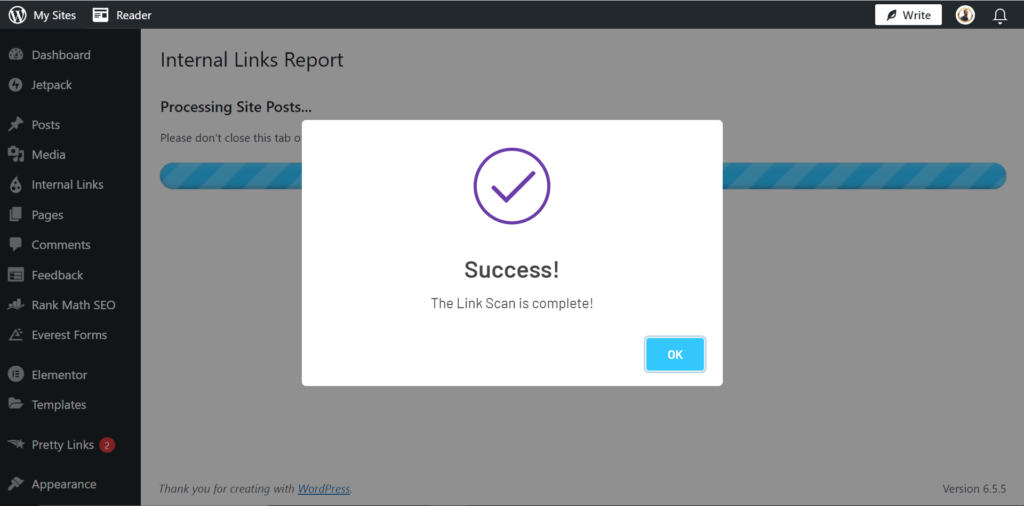
Once you have installed Link Whisper, you can run a link scan from the Dashboard. The Link scan crawls the pages and links that are available on your site.
After the scan, the Plugin is ready to be used.
But before diving into other things.
I would suggest you customize the Settings.
Simply head over to the settings section and start personalizing the linking approach.
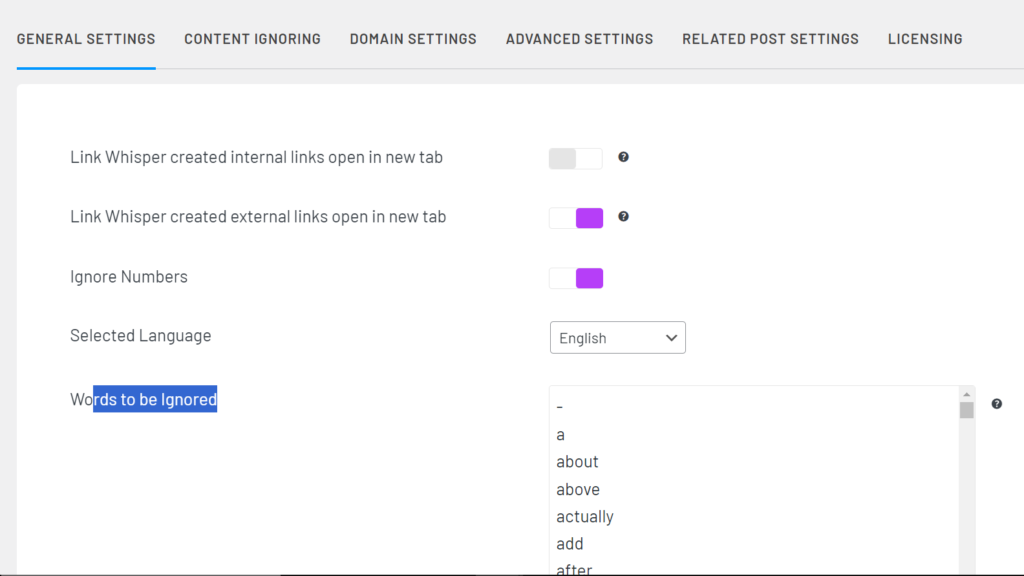
From the General Settings, you can choose to allow Link Whisper’s created internal/external links to open in new tab or not.
You can ignore numbers from being included as part of the suggested Anchor opportunities.
You can of course change the Plugin’s language here. It’s defaulted to English.
However, you can still run Link Whisper with other languages. What we mean is that it doesn’t matter the language you’re using on-site.
Link Whisper supports 21 languages including Francais, Español, and Dutch.
Other noteworthy things that you can customize from the General settings section include
- 1. Number of Sentences to Skip: This considers the positioning of sentences for the internal linking job. You can choose to skip one or two sentences so that the linking approach doesn’t seem spammy
- 2. Words to be ignored: This contains an array of jargon and words that aren’t good to be included in Anchor Texts. Link Whisper comes with a long list of them, and you can still set the ones you know of. Good examples of them include: “a”, “about”, “actually”, “as”, “at”, etc.
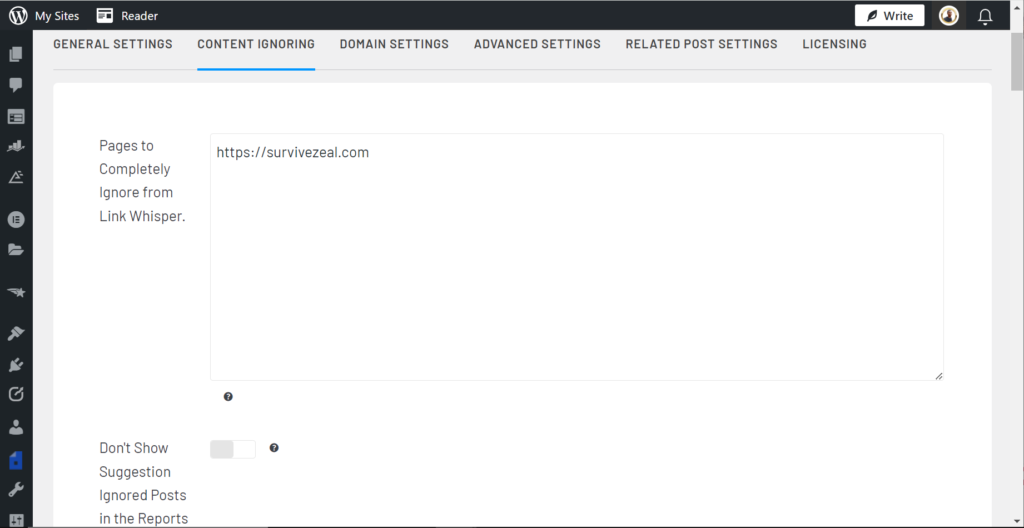
Link Whisper has an option in the Settings called Content Ignoring. You can set Pages, Posts, or Categories that should be ignored from its services. The services range from Link suggestions, Auto-Linking, internal links reports, etc.
Another section is the Domain settings. From here, you can set global link attributes and behaviors for the Domains on your site.
You can manage everything about External/Internal links here. If you want them to behave in a certain manner, you can set that up here.
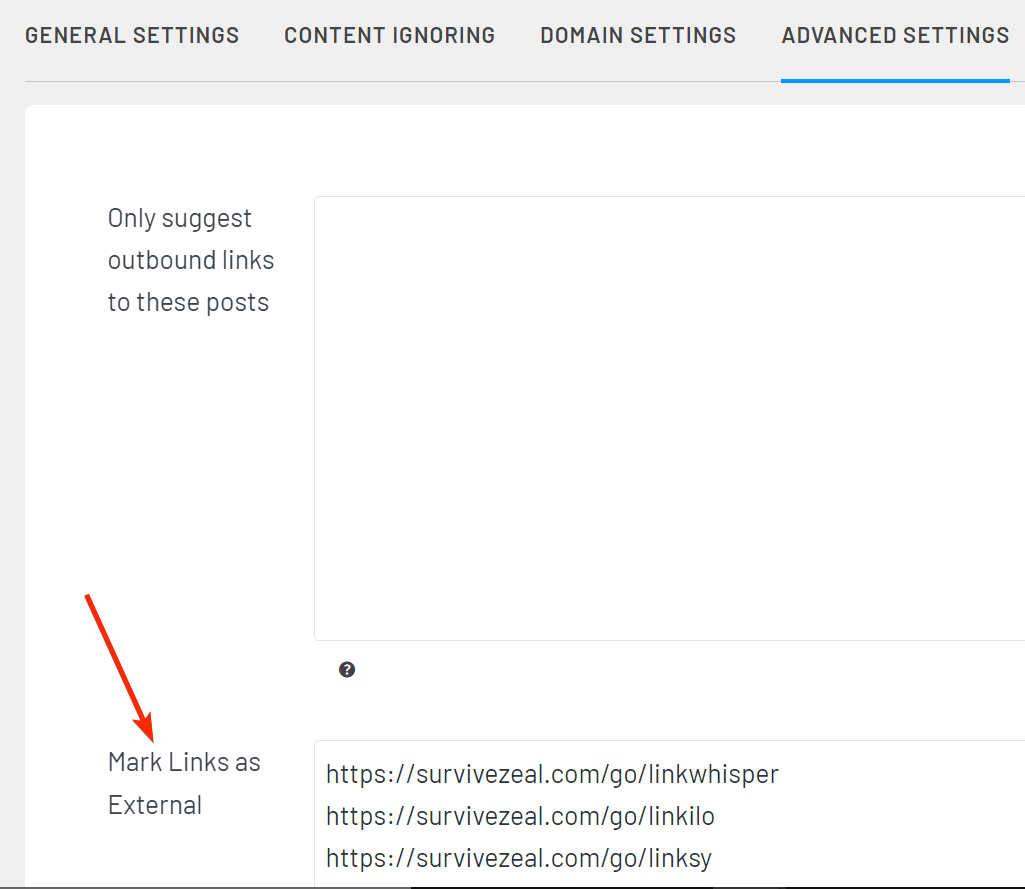
The Advanced Settings section lets you do advanced things. For instance, you can specify Links that Link Whisper should mark internal.
In our case, we listed all our cloaked links from Pretty Links. This way, we were able to have those external links open in a new tab than open in the same tag which is wrong.
You can do a whole lot outside this from here. Just go through the settings and apply what is right for your purpose.
Important: We noticed that the Plugin has the best settings for most users already. So you may not even need to change the settings.
Importing Target Keywords from SEO Plugin
After Link Whisper is ready, it’s time to import the focus keywords you have set in your favorite SEO Plugin.
Link Whisper does this automatically anyway. The only thing you should ensure is that you have the SEO Plugin active on your site.
The Plugin collects the targeted Keywords and they will be used to suggest even better internal linking opportunities.
Configuring and fine-tuning Target keywords
It’s possible that you have not been setting enough target keywords for your Pages all this while. Now that you want to use Link Whisper, it’s time to take that work with utmost seriousness.
We know that the Target Keyword(s) is just like the brain of the internal linking Plugin. Therefore, including more of them will help the tool a lot.
So if you have Pages that lack rich SEO focus keywords, then you can quickly heal them using Link Whisper’s Target keywords section.
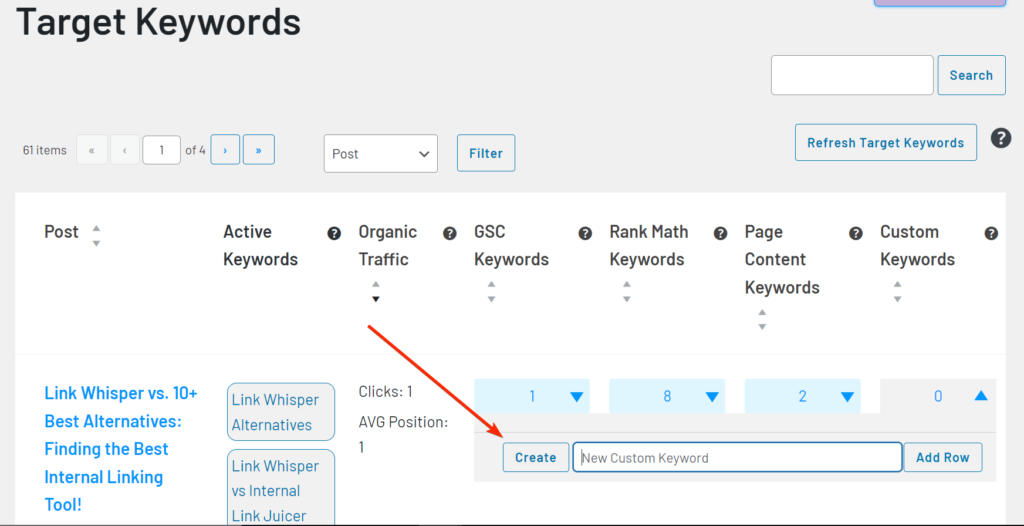
From there, you no longer have to open these Pages one by one. You can set Target keywords for all your pages from one location.
You can also edit poor-focus keywords right from here.
Before we forget, you can connect Link Whisper to GSC from the settings and further relevant Keywords will be imported.
PS. Bear in mind that spending some time with the Target Keywords isn’t mandatory. Link Whisper will still work without it, though it relies on it for better output.
Starting from the Dashboard… At a glance!
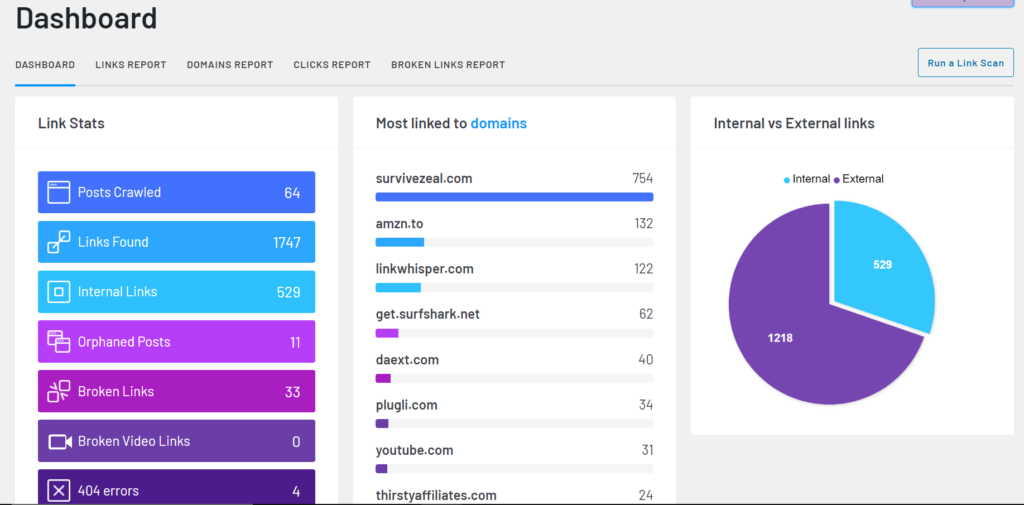
Link Whisper is completely ready for us.
We can take a glance at what the tool has to offer from the Dashboard.
The tool shows a snapshot of our internal linking profile, revealing our current progress, errors, weaknesses, and potential areas for improvement.
Here are the data that we can see from the Dashboard
- 1. Number of Post Crawled
- 2. Number of Links found
- 3. Number of Internal Links
- 4. Number of Orphaned Posts
- 5. Number of Broken Links
- 6. Number of Broken Video Links
- 7. Number of 404 errors
- 8. Most Linked-To Domains
- 9. Internal vs External links count
By clicking on the respective data, one can be able to expand the information.
How to use Link Whisper’s outbound internal link suggestions to build outgoing internal links
Now, let’s take a look on how to use Link Whisper to build internal links as you write on WordPress.
As you do your stuff on WP or Shopify, Link Whisper delivers internal link suggestions by computing keywords that have appeared on your piece of content.
For you to use this type of Link suggestions (outbound), you must open one of your created pages to the Edit environment or you can create a new one.
As you can see, we are now on the WordPress Editor.
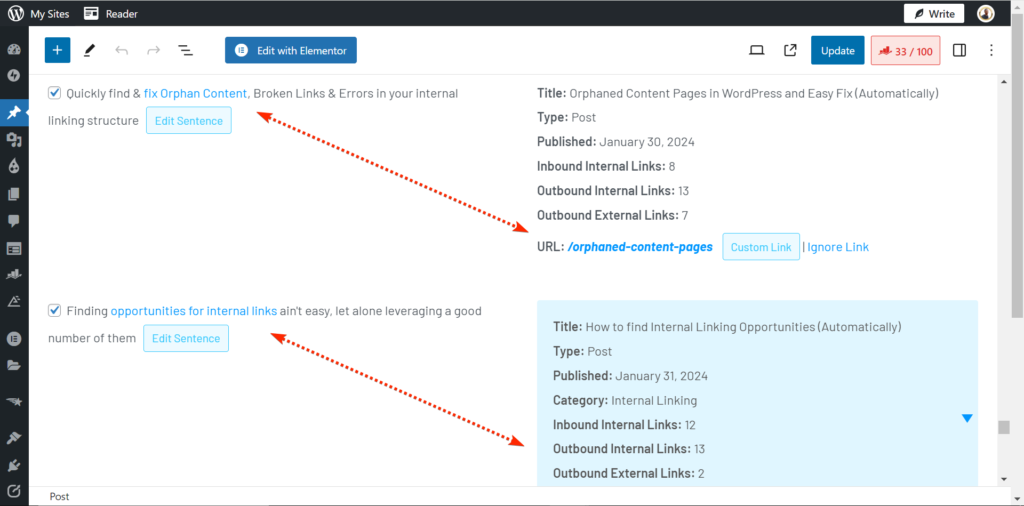
And as we write, the tool uses NLP which runs in the backend alongside the focus keywords we’ve set, to match opportunities to relevant pages from our content.
The Link suggestions is a box made up of two parts; the one on the right contains the Anchor opportunities which Link Whisper has identified from our content, the one on the left contains Proposed pages that should go with the suggested Keywords (Anchors), making them internal links.
The connection is only a suggestion and is up to the user to either accept or reject them.
If you find it useful, you just click on the check button. If you find it irrelevant, you can just ignore it.
Thankfully, you can use various things to better the relevancy of the suggested opportunities.
You have the Focus/Target Keywords, and just like we said above. It’s just like the Brain of the Plugin.
Important: This is called outbound link suggestions and it can be especially useful for folks who don’t have complete knowledge of the Pages that are available on their site.
How to use Link Whisper’s Inbound Link suggestions to build incoming internal links
Link Whisper’s Inbound Link Suggestion(s) is the best feature of the Plugin.
As opposed to the Outbound version, links that are created through this are called Inbound internal links.
The suggestion for link-able opportunities doesn’t appear as you write on WordPress. Instead, the Plugin puts a particular page into effect, and then it will run its AI to spot Anchor possibilities from the content you already have.
The Inbound Link Suggestion nullifies the idea of opening relevant pages for internal link building after which you publish a new Page.
Let’s see how we can make use of this tool.
You can create Inbound internal links to your Pages from many places.
But we’ll consider the bold one right now!
Link Whisper has it as one of its tabs on WordPress.
To build internal links from existing pages to a new page automatically, you just have to open the “Add Inbound Internal Links” section.
When opened, the tool directs you to the Internal Links Report. From there, you can find Orphaned Pages as well as ones with poor inbound links.
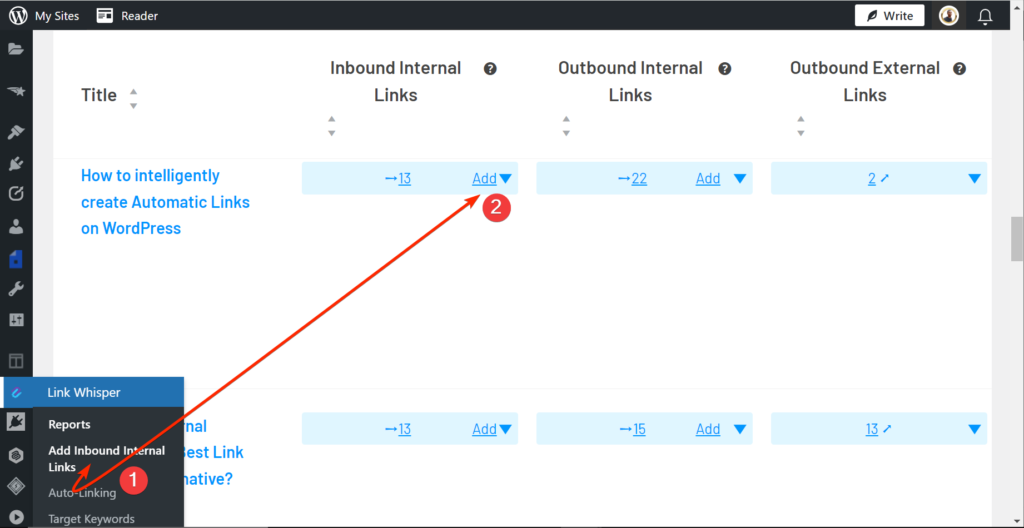
Having found a Page, you can just click on the Add Inbound Links button. Then Link Whisper leads you to its Inbound Link Suggestions tool from where you can build links anyhow you want.
The tool uses the same AI (NLP) and your target keywords to find link-able opportunities for your selected page.
The inbound internal link suggestion(s) are displayed in the order of their relevancy. The best ones appear first and poor ones are shown below the fold.
It’s over to you to select the anchor opportunities that you want.
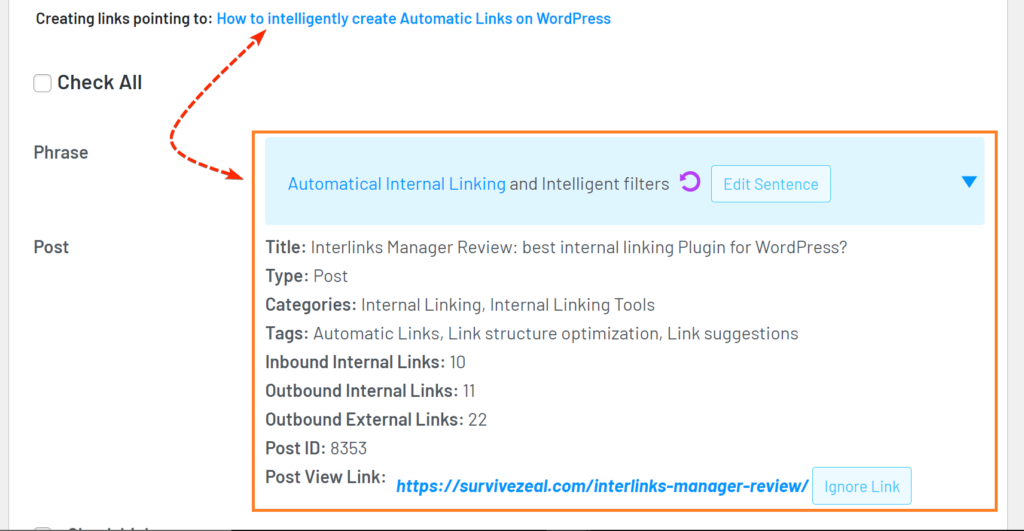
Needless to say, you can edit the Anchor Texts suggestion if it doesn’t seem right to you.
When done, you just hit the Add Links button and Link Whisper will do the homework for you.
Link Whisper’s Internal links Reports: Using it to find/fix orphaned content
Here, we will work you through on how you can use Link Whisper’s Internal Links Report to find and easily fix Orphaned content.
In order to locate the Orphaned Posts on your site, you can locate the Dashboard. Alternatively, you can use the Internal Links Report.
When you’re on the Internal Links Report page, typically, Link Whisper arranges your posts in the descending order of juice profile. From here, you can easily find your low-level Pages and take the necessary steps to heal them.
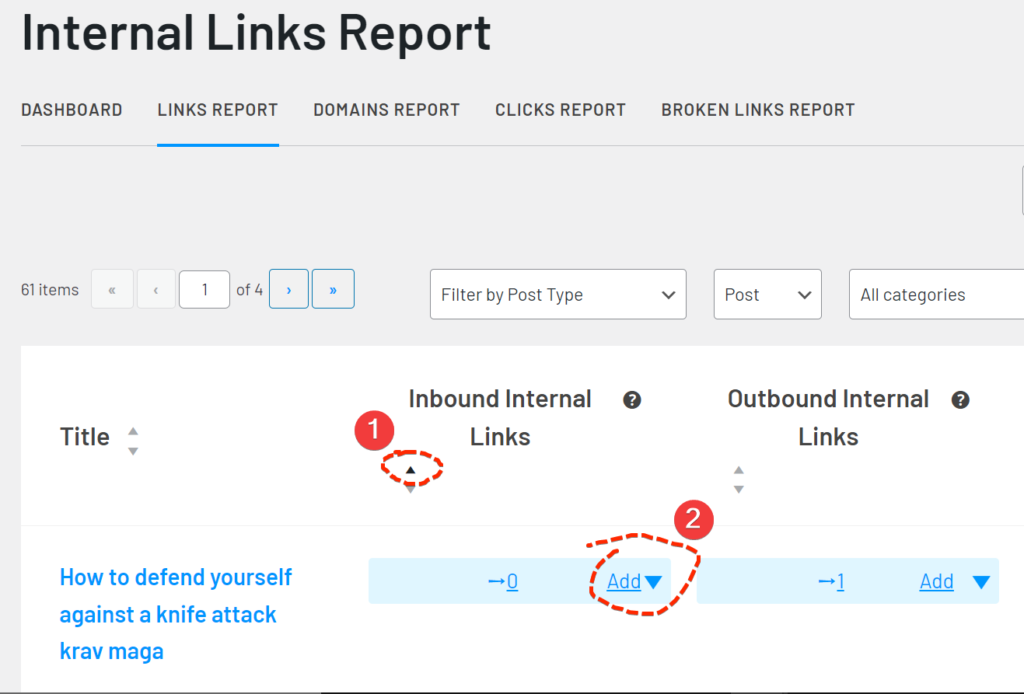
In case the Plugin doesn’t show low-level Pages at your click, you can use sorting (or search by Keywords) to find them. You can sort your Pages by the descending order of Inbound link count, you can filter by Post Type, Categories, or by URL/Keyword.
When you find that Page that needs a helping hand, simply click the “Add Links” button, and Link Whisper will follow its usual way of recommending link-able opportunities to connect them.
From the suggested internal link opportunities, you can fix the Orphaned posts fast without even having to open them to the Edit environment.
Link Whisper’s Internal Links Analysis: Using it to find internal/external links to a page
The Links Analysis is still found in the Links Reports section.
The Links Report shows you mere information, the Link analysis takes it to the other level.
If you have been struggling to discover the internal (or external) links that are present on a page, Link Whisper has the answer.
To start… Visit the Links Reports section.
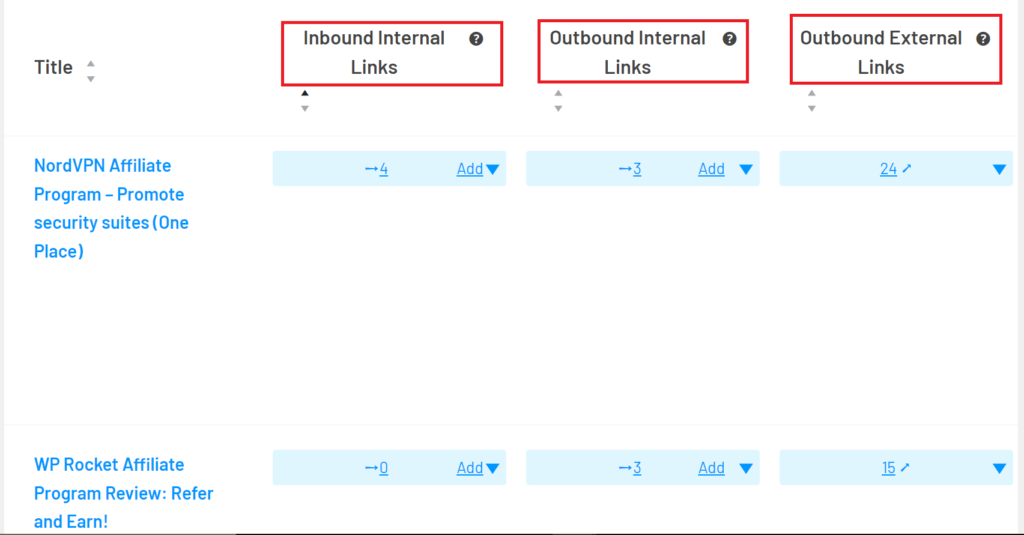
Here, the Link Whisper WordPress Plugin shows us the number of links that are present for each of our Pages.
The information is classified as Inbound internal links, Outbound internal links, and External Links.
The Links Report shows us mere value counts obviously.
To navigate to the Links Analysis, you just have to use the expand icon next to each Report.
Having expanded the “Inbound internal links” for one of our Pages, we can now see all the inbound links that point to that page.
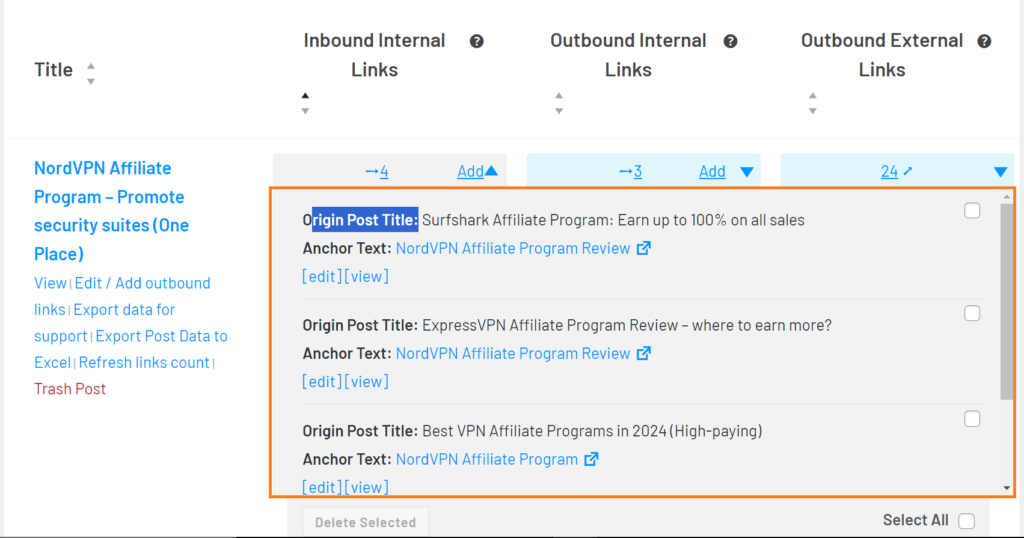
Link Whisper shows us the “Original Post Titles” from where the inbound links come from, as well as the “Anchor Texts” in use.
Surprisingly, we can control many things from where. For instance, we can delete any link that we want without following the page to the Edit environment.
This is how you can find inbound internal links to a Page using Link Whisper.
To find outbound internal links (i.e., the links that are used on that page), just repeat the same thing but now, from the Outbound Links Report.
You should use the same method to find the external links that are present on each page.
How to use the Autolinking feature to build hyperlinks
To convert keywords to links with Link Whisper, simply navigate to the Auto-linking section.
Then start entering a Keyword along with the Link you want it to connect to.
Check the gear icon to expand the Autolinking rules.
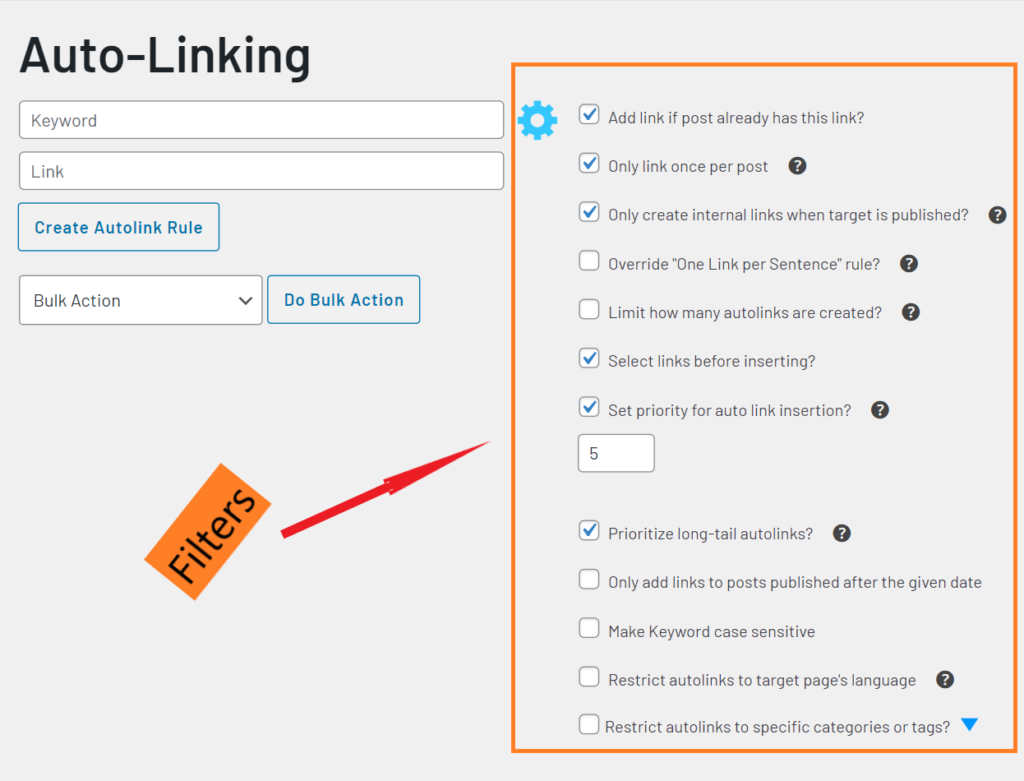
The Autolink rules or filters make it possible to control the placement of automatic links on your site.
The filters contain the following checkboxes
- Add Link is post already has the link
- Only link once per post
- Only create internal links when target is published
- Override “one link per sentence rule”
- Limit how many autolinks are created
- Select links before inserting
- Set priority for auto link insertion
- Prioritize long-tail autolinks
- Only add links to posts published after the given date
- Make keyword case sensitive
- Restrict auto links to target page’s language
- Restrict auto links to specific categories or tags
Of course, they are self-explanatory.
The best of the best filter in this list is the Select Links Before Inserting. We use it every time we build an automatic link.
The rule makes it possible for us to review the places that are to be converted in advance so that we can take proactive action.
If the place (i.e., the Sentence where our target keyword appeared) is off-point or irrelevant, we can safely ignore it.
Back to our stuff… After you have provided your Keyword and the Link plus set some Autolinking rules, it’s time to publish the link on our site.
Use the “Create Autolink Rule” and there you have the link placed on your site within seconds.
How to use Link Whisper’s URL changer
With the same idea of automated internal linking, Link Whisper comes with a feature called the URL changer. This is used for URL Replacement.
To replace existing links with new ones on your site, head over to the “URL Changer tab”
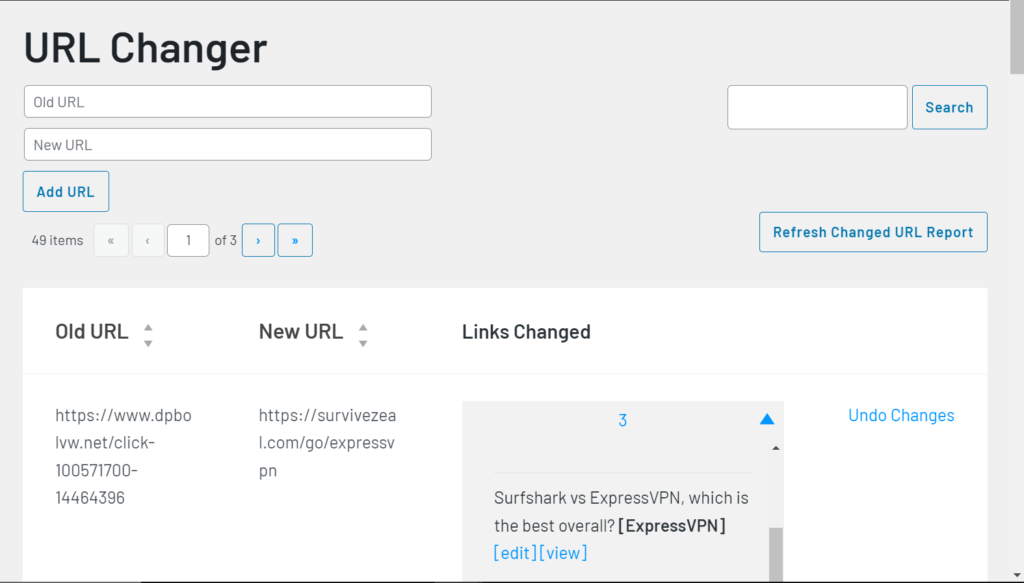
From there, you can start by typing the Old URL with respect to the New One.
When done, use the “Add URL” button and the internal linking tool will do the replacement for you.
That’s how you can simply replace Old links with new ones on Link Whisper.
How to use the Linked-To Domains Reports and Settings to set global link attributes and behaviors
Did you know that Link Whisper can stop you from repeating Link attribute and behavior settings for URLs on WordPress?
Let’s see how it works.
To start, head over to Reports > Domains Reports.
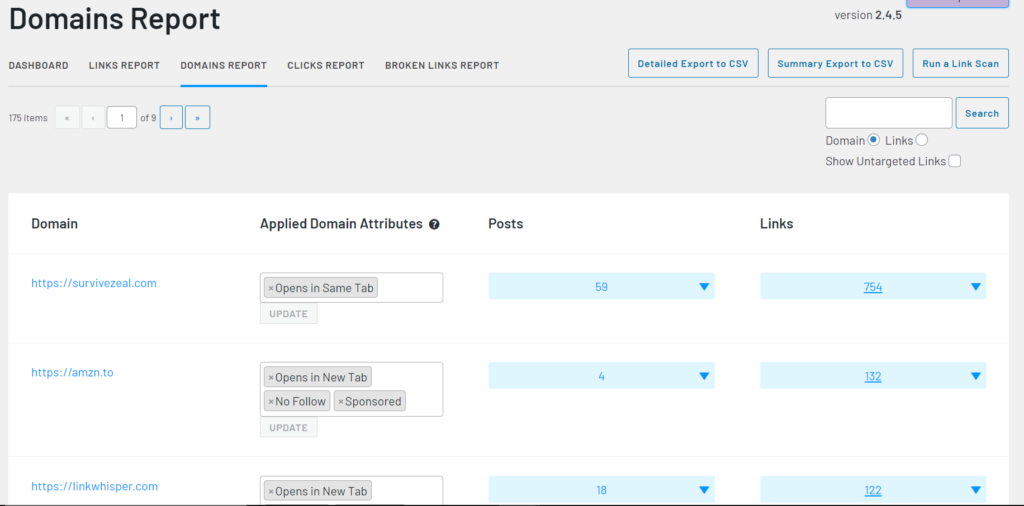
From the Domains Reports, we have all the Domains that have appeared on our site. Their links as well as the Posts where they are present are also given.
All the Links from the same Domain are classified under its root Domain. We can view them right from here and we can make deletes also.
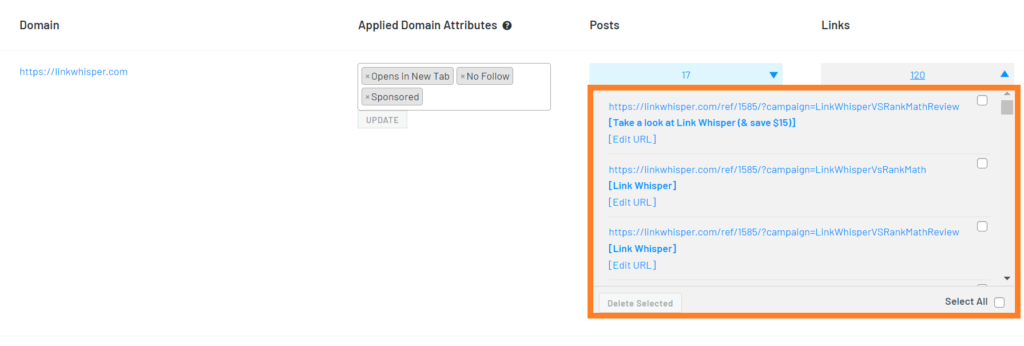
The Posts where the Links appeared are all shown and we can view or edit the post from here.
We have just digressed from our main point. Let’s now consider how we can apply Link attribute/behavior that these Domains will inherit on the global level.
To do that, refer to the “Applied Domain Attributes” next to the Domain you want to configure.
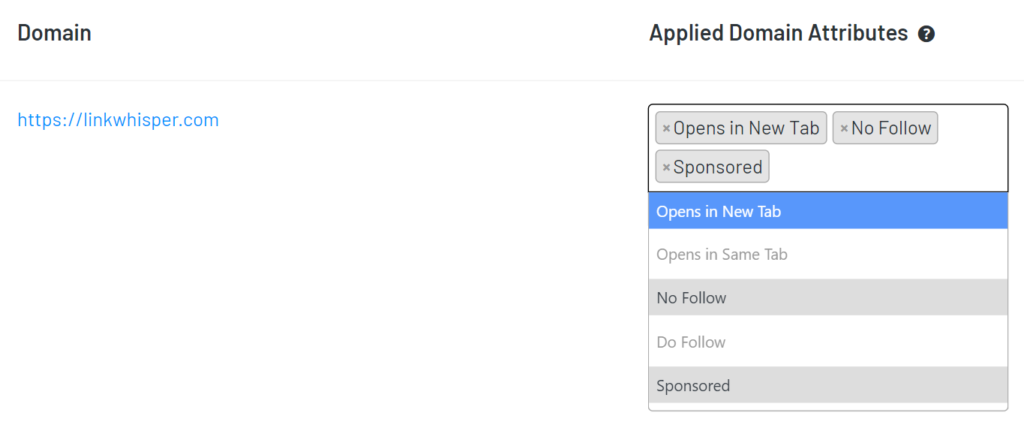
From here, we can set Link Attributes (like Nofollow, Dofollow, Sponsored) and also Link behaviors (like Open Same tab, Open New Tab), and Link Whisper will apply the settings throughout your site.
That’s exactly how you can stop inconsistency issues associated with Link Rel on WordPress.
Using the Link Clicks Reporting to track internal and external link performance
Link Whisper shows you a detailed Link click report for your pages.
Every page on your site will have its own Link clicks Report.
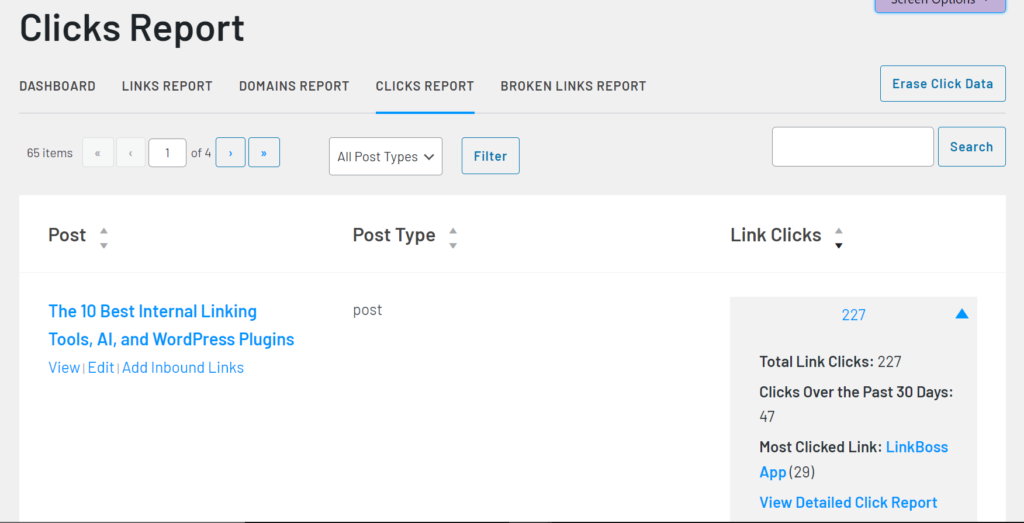
The Report reveals the total link clicks on a page for a given period of time, as well as the most clicked link, at a glance.
To expand the Report, use the View Detailed Click Report.
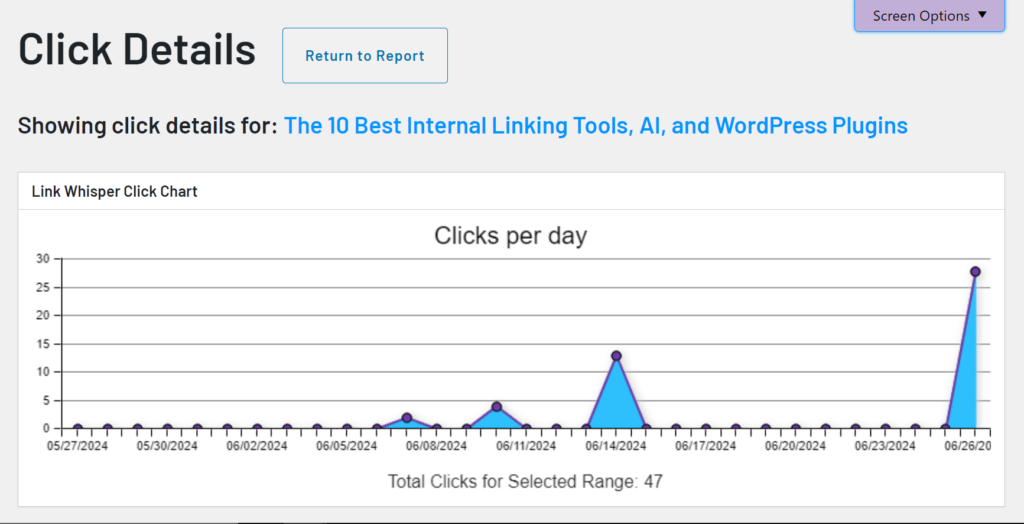
The Detailed Click Report shows in-depth information such as a graph that illustrates click performance for the selected timeframe.
When you scroll down, you’ll be wowed with the following information
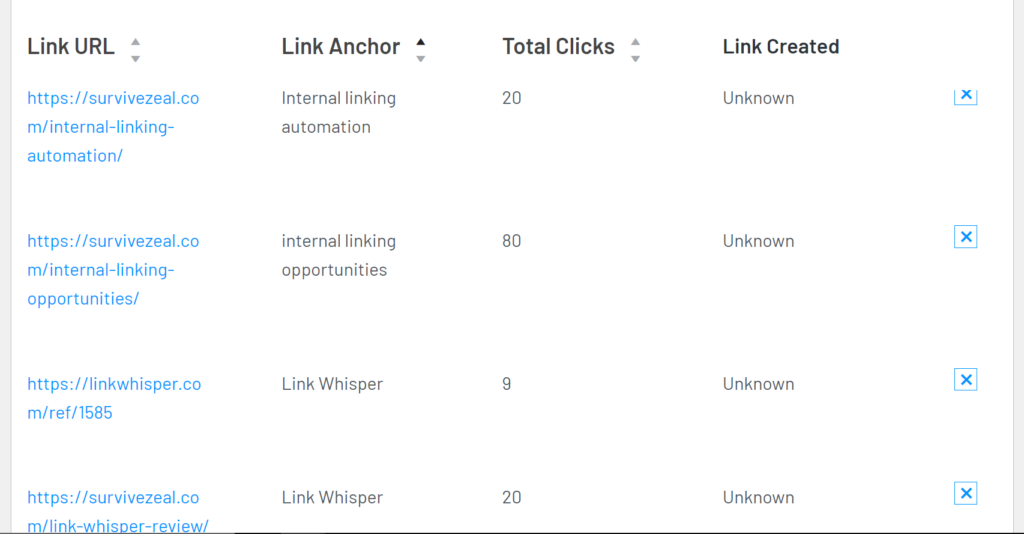
1. Link URL
2. Link Anchor
3. Total Clicks
The Plugin goes deeper to extract this information so that the Report is complete.
What we have just covered is how you can use Link Whisper to track link clicks for your Pages.
What about ordinary URLs or Links? Can you track their click performance site-wide?
Yeah, Link Whisper also lets you ascertain how well your links are performing across your site.
From the image above, we are viewing the Click Details for the URL /internal-linking-tools/
And there’s a graph within that illustrates click patterns for the selected period.
As usual, when we scroll down, we can find more helpful information.
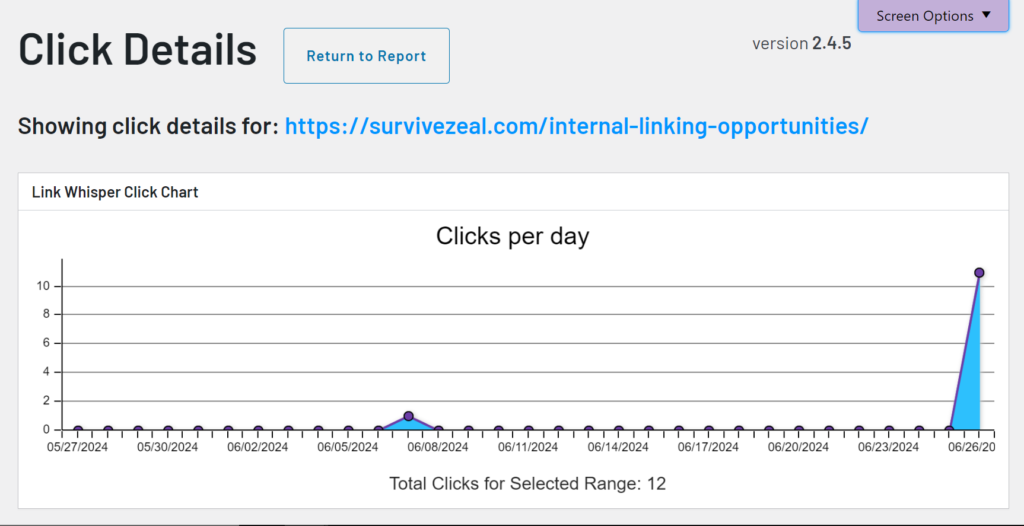
Here’s what we have for the standalone Links Report
1. Post
2. Link Anchor
3. Total Clicks
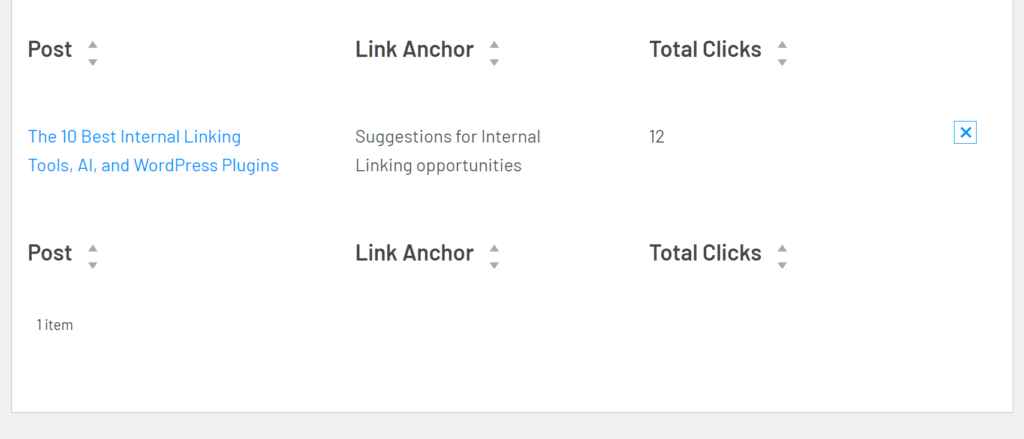
The Post column reveals the Pages where the Link in question appeared, the Link Anchor shows the respective Anchors from those Pages, and the Total Clicks column reveals the number of successful hits.
This is how Link Whisper can be used to monitor Clicks Report for your Links (internal or external) and Pages.
How to use Link Whisper’s Error Reporting to find and fix Broken Links
The main idea of Link Whisper is to automate internal linking. And it has not given up when it comes to powering other functions that facilitate internal linking.
Finding broken links stress-free and fixing them is one of the ways to free some time for other stuff.
Link Whisper detects Broken Links right away and it gives you superior abilities to get rid of them.
To use the Broken Links Report, navigate to Reports > Broken Links Report.
Next, use the “Scan for Broken Links” button if this is your first time. Then wait a second to see the tool uncover them for you.
Link Whisper is beautified with utmost details, and is up to the extent that you’ll no longer need your Broken Link Plugin when you have it.
The Plugin shows you the following details for your Broken Links
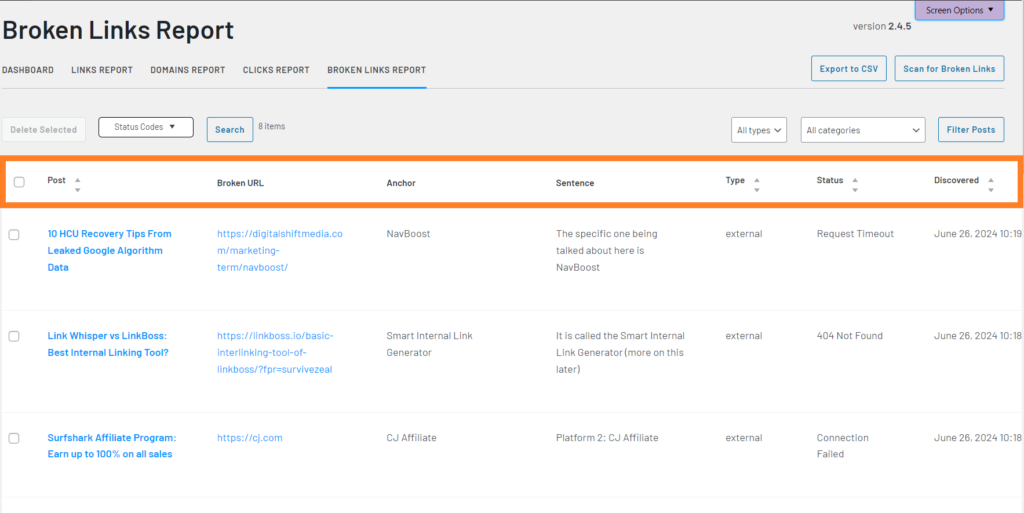
- “Post” where it appeared
- Broken URL
- “Anchor” in use
- “Sentence”
- “Type” of the Broken URL
- “Status” code
- “Discovered” time
The information is detailed and contains all you need.
To get rid of a Broken Link from the list, just use the Edit button to enter a valid URL.
That’s how easily you can fix Broken Links with Link Whisper.
Internal linking best practises
- Build a Content Hub and Grow With It: Create interconnected clusters of content around a central topic to establish authority and to have better navigation.
- Link Sculpt Your Page Authority to Your Important Pages: Direct internal links strategically to boost the ranking potential of your most valuable pages.
- Link Important Pages First Using Properly Optimized Anchors: Prioritize linking to high-priority pages using relevant and descriptive anchor texts.
- Link Contextually, Not as Much as Possible: Ensure links are added naturally within meaningful content rather than overloading with unnecessary links.
- Use the Right Link Attribute: Differentiate between “follow” and “nofollow” links based on the value and purpose of the page being linked.
- Don’t Use the Same Anchor Texts for Different Pages: Avoid confusion by using different anchor texts for each linked page.
- Link from Old relevant Pages to boost Your New Pages: Regularly revisit older content to add links to newer pages.
- Get rid of Orphan Content, Broken Links, and 404 Errors: Eliminate pages without internal links and fix any broken links to improve user experience and SEO.
- Amplify the process with an Internal Linking Tool: Leverage tools to identify linking opportunities and automate repetitive tasks efficiently.
- Analyze and Adapt: Track Your Internal Linking Success: Monitor performance metrics and refine your strategy for better results over time
Conclusion
Link Whisper is a very cool plugin with many features that people don’t know about. They are only aware of its link suggestion power, being the primary feature that is mostly advertised.
Aside of the incredible ability to uncover linking opportunities, Link Whisper does a whole lot.
It even supercharges a good portion of affiliate marketing, thanks to Autolinking, Link accessibility settings and more.
Using Link Whisper and making most of it can only be secured after long time of using the tool.
As aforementioned, Most people that use the plugin particularly the free version, don’t know many amazing things about it.
Above all, Link Whisper is easy to use and the eyes gets familiar with it as it sees it.
Our guide to using Link Whisper will quicken your usage of its hidden features.
PS. We’ve a discount code for Link Whisper (zealoff). Use it and save the biggest.
FAQs
Do You Need Link Whisper
Well, that’s a reasonable question to answer!
Link Whisper is made for these type of people
- Established blogs with a good amount of published content (50 and above is better)
- A blog with different contributors, leading to unnoticed posts
- Someone who owns two or more sites and would like to get suggestions to link them in-between
- Someone who want AI power in the area of internal linking
Link whisper isn’t made for newly found sites or blogs with little content. It would be so doable to perform your internal linking manually in those conditions.
Is there a free version of Link Whisper?
Yes, Link Whisper does have a free version with limited features. I have covered that separately on another post.
Check Link Whisper Free here and what it has in features. You’ll also get to know how it compares to the premium solution.
What are the alternatives to Link Whisper?
Link Whisper currently has an umpteen number of alternatives after existing as an almost monopoly for years.
Here are the best ones:
- Linksy Plugin: best alternative in terms of feature match and replica
- Linkilo Plugin: best overall Link Whisper alternative
- Internal Link Juicer: great for keyword-based linking
As of the time of updating this piece, Link whisper beats all these alternatives to a great extent.
How to automate internal linking?
Parts of internal linking can be fully automated while freeing some time for other stuff, like focusing on producing more rich content or even taking extra downtime.
One of the best ways to automate internal linking is by using a tool that is dedicated to it. We recommend Link Whisper which is currently the best in this regard.
Processes like finding internal linking opportunities to use, converting Keywords to Links, and Link attribute/behavior choices (just to name a few) can be automated using Link Whisper.
With the Plugin, gone are the days when you have to open your older Pages to internal-link your new content. This is the primary function of Link Whisper.
Check our ultimate guide to internal linking automation to understand what can be currently automated.
What’s the best internal linking tool?
After we have thoroughly reviewed top internal linking tools, Link Whisper flaunts itself as the best overall.
In terms of Link suggestion quality and reliability, Link Whisper leads the market.
What is the biggest Link Whisper Discount code?
The biggest Link Whisper Discount code that you will ever get is ZEALOFF, and it gives you $15 OFF any purchase.
Don’t forget to use it anytime you’re ready to get Link Whisper.
We appreciate your time! If you have a comment, drop it down below, responding in minutes…



Link Whisper Biggest Discount Code, Coupon and (Lifetime Deal)
[…] You can check how to use Link Whisper to automate internal linking. […]
Link Whisper Review 2024: Still the #1 internal linking tool?
[…] Read also: How to use Link Whisper […]
AI Internal Linking Tools and WordPress Plugins (Link Smarter)
[…] Internal linking automation by Link Whisper is efficient. […]
How to activate Link Whisper Free Trial (Hidden gem)
[…] After activating Link Whisper Free Trial, you should now proceed to using the tool. It’s easy to digest thankfully. But anyway, we have made a guide on how to use Link Whisper for internal link automation. […]
Internal Linking Automation: Ultimate Guide (plus Tools)
[…] internal linking is still a thing as it correlates to position shifts on SERPs (either downward or […]